How to install and configure the Apache web server on Linux Mint
CS-160: Software Engineering
Instructor: Rob Bruce
Fall 2016
OBJECTIVE: to install and configure Apache web server with the Common Gateway Interface (CGI) on Linux Mint.
- Launch a terminal window (also known as a command line prompt or shell).
Step 1 of 15: In terminal window, log in as root
- In your terminal window type the following at the command prompt: su
- You will be prompted to enter the root password. Enter that password.
- Your terminal window should now display a "#" (hash mark) prompt. This indicates you are logged in as root!
Step 2 of 15: update software library cache
- First we need to update our cache of software libraries that are available to install or update.
- In your terminal window type the following at the command prompt (you should be root): apt-get update
Step 3 of 15: install Apache
- Now that we've updated our cache, the next step is to install the Apache web server.
- In your terminal window type the following at the command prompt (you should be root): apt-get install apache2
Step 4 of 15: Enable PHP in Apache.
- In your terminal window type the following at the command prompt (you should be root): apt-get install php7.0 libapache2-mod-php7.0
Step 5 of 15: Enable the Common Gateway Interface (CGI) in Apache.
- In your terminal window type the following at the command prompt (you should be root): a2enmod cgi
Step 6 of 15: Restart the Apache server.
- In your terminal window type the following at the command prompt (you should be root): service apache2 restart
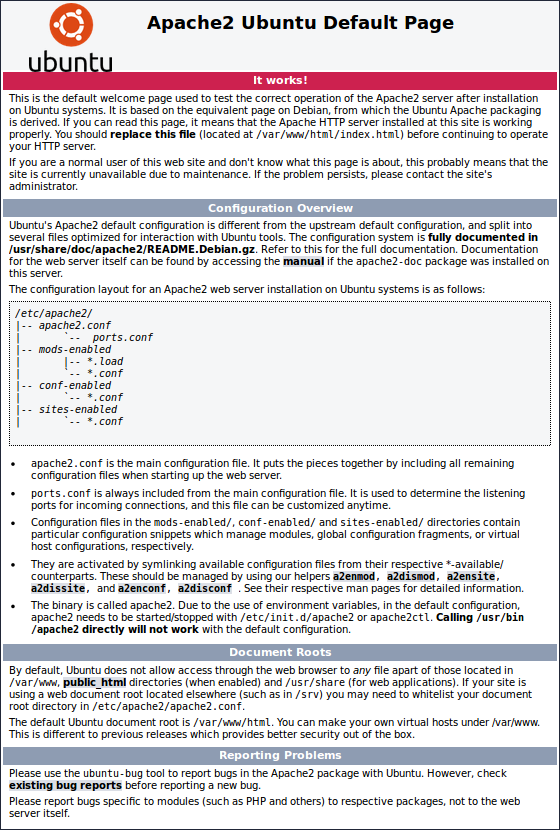
Step 7 of 15: Verify that the Apache web server is running.
- Point your browser to the following URL at http://localhost
- Your browser should display a page that looks like this:
Step 8 of 15: Create a test PHP program.
- Select then copy (<ctrl><c> is hotkey for copy in Linux) the following text:
              <?php

              phpinfo();

              ?>
Step 9 of 15: Paste the PHP program into the Apache web directory
- In your terminal window type the following at the command prompt (you should be root): cat > /var/www/html/test.php
- In your terminal window (you should be root) press <ctrl><shift><v> to paste the previously selected text
- In your terminal window (you should be root) press <ctrl><d>. Press <ctrl><d> again.
- You should now have a program saved in /var/www/html/test.php
Step 10 of 15: Change owner and group permissions for PHP program
- For security reasons, no PHP programs should be owned by root or have group editing privileges as root.
- In your terminal window (you should be root) enter the following text: chown www-data:www-data /var/www/html/test.php
- In your terminal window (you should be root) enter the following text: chmod 755 /var/www/html/test.php
Step 11 of 15: Verify that the Apache web server will execute PHP program encoded web content
- Point your browser to the following URL at http://localhost/test.php
- Your browser should display a page that looks similar to this:

Step 12 of 15: Create a test CGI program in Python.
- Note: All cgi-bin applications (interactive web page content generated dynamically) are located on your computer at the following path:
/usr/lib/cgi-bin/ - Select then copy (<ctrl><c> is hotkey for copy in Linux) the following text:
              #!/usr/bin/python

              print "Content-type:text/html\r\n\r\n"

              print '<html>'

              print '<head>'

              print '<title>Python program in cgi-bin</title>'

              print '</head>'

              print '<body>'

              print '<h2>This Python program is running from the cgi-bin directory.</h2>'

              print '</body>'

              print '</html>'
Step 13 of 15: Paste the Python program into the cgi-bin directory
- In your terminal window type the following at the command prompt (you should be root): cat > /usr/lib/cgi-bin/test.cgi
- In your terminal window (you should be root) press <ctrl><shift><v> to paste the previously selected text
- In your terminal window (you should be root) press <ctrl><d>. Press <ctrl><d> again.
- You should now have a program saved in /usr/lib/cgi-bin/test.cgi
Step 14 of 15: Change owner and group permissions
- For security reasons, no cgi-bin programs should be owned by root or have group editing privileges as root.
- In your terminal window (you should be root) enter the following text: chown www-data:www-data /usr/lib/cgi-bin/test.cgi
- In your terminal window (you should be root) enter the following text: chmod 755 /usr/lib/cgi-bin/test.cgi
Step 15 of 15: Test access to your cgi-bin application with your web browser
- Point your browser to the following URL at http://localhost/cgi-bin/test.cgi
- You should see output like this:
This Python program is running from the cgi-bin directory.
Miscellaneous notes:
- All web documents (including PHP encoded web documents) are located on your computer at the following path
/var/www/html - For example, when you type the URL at http://localhost/index.html, Apache is accessing index.html located on your computer at the following path:
/var/www/html/index.html - Alternately, when you type the URL at http://localhost/test.php, Apache is accessing test.php located on your computer at the following path:
/var/www/html/test.php - All cgi-bin applications are located on your computer at the following path:
/usr/lib/cgi-bin/ - For example, when you type the URL at http://localhost/cgi-bin/test.cgi, Apache is accessing test.cgi located on your comptuer at the following path:
/usr/lib/cgi-bin/test.cgi - You can create dynamic web and process form data either through the Common Gateway Interface directory (cgi-bin) or through the PHP interpreter enabled in Apache.
- You should make sure all static web pages, all PHP web pages, and all cgi-bin programs are owned by www-data with group access for www-data. Lastly, you should make sure all PHP content or cgi-bin content should be set to read and execute only with NO write permissions (i.e. chmod 755).
Robert Bruce
Research
Courses
Fall 2016, CS-160:
Lectures:
- What is software engineering?
- Postgres RDBMS (Relational Database Management System)
- Document management
- FFMPEG library and systems programming tools
- Project management
- Processing FORM data from an HTTP POST
- Requirement gathering
- High and low level design
- Secure session management with HTTP
- Programming the Postgres C API (Application Programmer Interface)
- Development
- Active Shape Modelling (ASM) and Active Appearance Modelling (AAM)
- Testing
- Eye pupil tracking
- Deployment, Metrics, and Maintenance
- Drawing with OpenCV
- Delaunay triangles
- Predictive models
- Iterative models
- RAD
Assignments:
- Programming Project 1
- Programming Project 2
- Programming Project 3
- Programming Project 4
- Programming Project 5
- Programming Project 6
- Final Project Oral Presentation
- Final Project Report
Handouts:
- Creating a bootable Linux Mint flash drive
- How to update software on Linux Mint
- How to install and configure the Apache web server on Linux Mint
- How to install and configure the Postgres database server on Linux Mint
- How to build and install Openface on Linux Mint
Programs:
- db_menu
- example_mkdir
- example_fork_exec_pipe
- example_draw_opencv
- example_draw_delaunay_triangles
- example_process_get_form_data
- example_process_post_form_data
Other
