Final Programming Project
Date due: December 7, 2015
Points possible: 20 points
CS-116A: Introduction to Computer Graphics
Instructor: Rob Bruce
OVERVIEW
For this project, you will be creating a simple paint and draw program in C, C++, or Java with the OpenGL Utility Toolkit (GLUT). The specifications are outlined below.
SPECIFICATIONS
1. The program must draw the following shapes:
- Line
- Rectangle
- Ellipse
- Bezier curve
2. Your program must draw rectangles and ellipses in filled or outline (unfilled) form. Bezier curves and lines should NOT be drawn in filled or outline form. Please do NOT include menu options to draw Bezier curves or lines as filled/outline.
3. Users should be able to select from a palette of 8 different colors when drawing a line, rectangle, ellipse, or Bezier curve. You may choose any colors for your palette as long as each color is visible on the paint canvas (the background of your screen). Please do NOT use black as a color choice on a black background canvas or white on a white background canvas.
4. Use the left mouse button for navigation and selection in the paint program drawing menu.
5. Use the right mouse button to select a control point (mouse cursor position) when drawing a line, rectangle, ellipse, or Bezier curve.
6. Bezier curves are drawn through a series of four mouse clicks. Bezier curves should be 1 pixel thick.
7. Lines are drawn through a series of two mouse clicks. Lines should be 1 pixel thick.
8. Please use white or black as the background for your drawing canvas.
9. You may use verbs such as "add" or "draw" in your menu items. For example, you may use "add rectangle" when drawing a shape. Alternately, you may use "draw rectangle" as a menu item instead
10. Your program must allow the user to draw at least twenty shapes (any combination of ellipses, rectangles, lines, or Bezier curves).
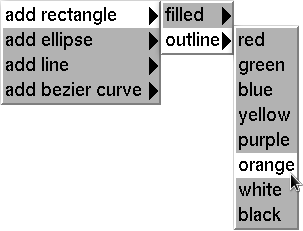
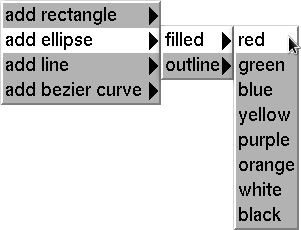
EXAMPLE 1: DRAW OUTLINE OF RECTANGLE IN ORANGE.
Here's an example of a mouse-driven menu that conforms to the above specification.
1. User clicks the left mouse button of a multi-button mouse:

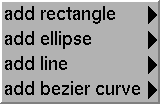
2. The program displays the following four sub-menus: "add rectangle", "add ellipse", "add line", and "add bezier curve".
3. The user wants to draw the outline (i.e. unfilled) of a rectangle in orange. The program should display the following:
4. The user moves the mouse somewhere on the screen and clicks the right mouse button of a multi-button mouse. This represents the starting corner for the rectangle.

5. The user moves the mouse somewhere on the screen and clicks the right mouse button again. This represents the ending corner for the rectangle.
6. The program then draws the outline of a rectangle in orange.

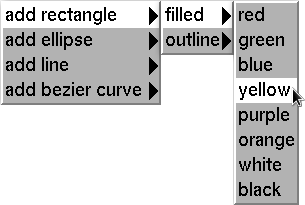
EXAMPLE 2: DRAW FILLED RECTANGLE IN YELLOW.
Here's a second example of a mouse-driven menu that conforms to the above specification.
1. The user clicks the left mouse button of a multi-button mouse:
2. The program displays the following four menu items: "add rectangle", "add ellipse", "add line", and "add bezier curve".
3. The user wants to draw a filled rectangle in yellow. The program should display the following:
4. The user moves the mouse somewhere on the screen and clicks the right mouse button of a multi-button mouse. This represents the starting corner for the rectangle.
5. The user moves the mouse somewhere on the screen and clicks the right mouse button again. This represents the ending corner for the rectangle.
6. The program then draws a filled rectangle in yellow.

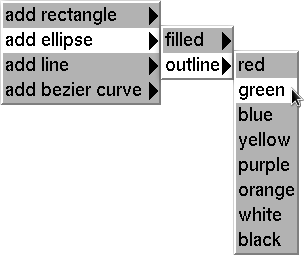
EXAMPLE 3: DRAW OUTLINE OF AN ELLIPSE IN GREEN.
Here's a third example of a mouse-driven menu that conforms to the above specification.
1. The user clicks the left mouse button of a multi-button mouse:
2. The program displays the following four menu items: "add rectangle", "add ellipse", "add line", and "add bezier curve".
3. The user wants to draw the outline of an ellipse in green. The program should display the following:
4. The user moves the mouse somewhere on the screen and clicks the right mouse button of a multi-button mouse. This represents the center of the ellipse.
5. The user moves the mouse somewhere on the screen and clicks the right mouse button again. This represents the major radius (radius along major axis).
6. The program then draws the outline of an ellipse in green.

EXAMPLE 4: DRAW FILLED RED ELLIPSE.
Here's a fourth example of a mouse-driven menu that conforms to the above specification.
1. The user clicks the left mouse button of a multi-button mouse:
2. The program displays the following four menu items: "add rectangle", "add ellipse", "add line", and "add bezier curve".
3. The user wants to draw a filled red ellipse. The program displays the following:
4. The user moves the mouse somewhere on the screen and clicks the right mouse button of a multi-button mouse. This represents the center of the ellipse.
5. The user moves the mouse somewhere on the screen and clicks the right mouse button again. This represents the major radius (radius along major axis).
6. The program then draws a filled red ellipse.

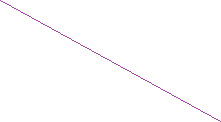
EXAMPLE 5: DRAW PURPLE LINE.
Here's a fifth example of a mouse-driven menu that conforms to the above specification.
1. The user clicks the left mouse button of a multi-button mouse:
2. The program displays the following four menu items: "add rectangle", "add ellipse", "add line", and "add bezier curve".
3. The user wants to draw a purple line. The program should display the following:
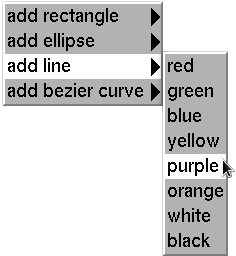
4. The user moves the mouse somewhere on the screen and clicks the right mouse button of a multi-button mouse. This represents the starting point for the line.
5. The user moves the mouse somewhere on the screen and clicks the right mouse button again. This represents the ending point for the line.
6. The program then draws a purple line that is 1 pixel thick.
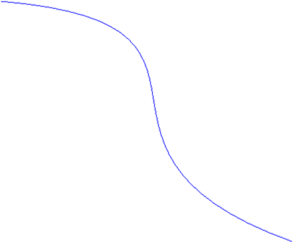
EXAMPLE 6: DRAW BLUE BEZIER CURVE.
Here's a sixth example of a mouse-driven menu that conforms to the above specification.
1. The user clicks the left mouse button of a multi-button mouse:
2. The program displays the following four menu items: "add rectangle", "add ellipse", "add line", and "add bezier curve".
3. The user wants to draw a blue Bezier curve. The program should display the following:
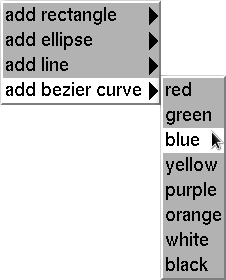
4. Upon clicking the left mouse button in step 3, the user has indicated they want to draw a blue Bezier curve one pixel thick. Now we must retrieve four control points from the user: the beginning point where the Bezier curve will start, the second control point, the third control point, and the fourth control point where the curve will end. The first and last control points will be on the curve while the second and third points will not be on the curve. The user moves the mouse somewhere on the screen and clicks the right mouse button of a multi-button mouse. This represents the first point of the Bezier curve.
5. The user moves the mouse somewhere on the screen and clicks the right mouse button again. This represents the second point of the Bezier curve.
6. The user moves the mouse somewhere on the screen and clicks the right mouse button again. This represents the third control point of the Bezier curve.
7. The user moves the mouse somewhere on the screen and clicks the right mouse button one last time. This represents the fourth control point of the Bezier curve.
8. Immediately after the user clicks the right mouse button a fourth time in step 7 above, a 1-pixel width Bezier curve is drawn in blue:
PLEASE INCLUDE THE FOLLOWING WITH YOUR PROGRAM
1. Please submit your program as a text file labeled "Final Programming Project" to the Canvas dropbox. I only need the source code. I will build the program myself.
2. Please name your programming project file with the following naming convention:
Lastname_Firstname_final_programming_project.c (for C programs)
Lastname_Firstname_final_programming_project.cpp (for C++ programs)
Lastname_Firstname_final_programming_project.java (for Java programs)
For example, my name is Rob Bruce. If I write my program in the C programming language, my final programming project should be named: Bruce_Rob_final_programming_project.c
3. Please include your name as a comment at the beginning of your program like this:
/* Rob Bruce */
or this:
// Rob Bruce
4. I usually do not need a makefile to build your programs, regardless of language; however, in the unlikely event that I cannot build your project, I will send an email inquiry as appropriate.
5. I expect your program to build without syntax errors.
6. I expect your program to execute without run-time errors.
GRADING
Points will be deducted for any program that does not meet the specification as outlined above.
LATE ASSIGNMENTS
Assignments submitted after the due date will be worth, at most, 10 points. Additional points will be deducted for programs not meeting the specification as outlined above.
Robert Bruce
Research
Courses
Fall 2015, CS-116A:
Lectures
- Light and Color (part 1 of 2)
- Light and Color (part 2 of 2)
- Introduction to OpenGL and GLUT
- Dissection of OpenGL/GLUT programming examples in C
- Dissection of OpenGL/GLUT programming examples in Java
- Splines
- Meshes: Vertices, Edges, and Faces
- Camera and clipping plane
- Linear transformations
- Interactive program to adjust frustum, near, and far clipping planes
- Metaballs and Blobbies
- Graphics File Formats
- Accelerated Graphics Hardware (GPU)
- GLSL: OpenGL Shading Language (part 1 of 2)
- GLSL: OpenGL Shading Language (part 2 of 2)
- Squash, Stretch, and Bounce: The twelve principles of animation
- Introduction to Blender
- Character Rigging for animation
- Algorithmic animation and modelling (part 1 of 2)
- Algorithmic animation and modelling (part 2 of 2)
- Introduction to Computer Vision
- Introduction to WebGL
Assignments:
- Programming Project 1
- Programming Project 2
- Final Programming Project
Other
