Chris Pollett >
Students >
Ramya
( Print
View )
[Bio]
Steps to install the project
Follow the below steps to install the project
- Download the project zip file and save it on your desktop
- Create a LAN setup. Our LAN setup consists of a web server, a web client and a proxy server, i.e., we need three systems running Windows Operating systems
- Once we have all the three systems, connect them in a LAN. Try to ping the systems from other two systems. If the systems cannot be pinged from one another, try switching off the firewalls and try again
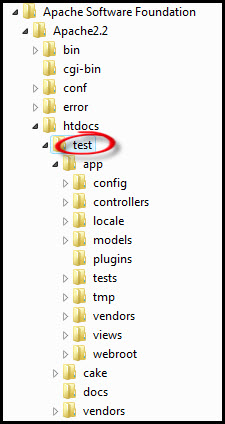
- Once the LAN system is established. Take the system 1 and make it as a web server by installing Apache HTTP server on it. Once Apache HTTP server is installed you can find the Apache folder in your C:\ drive. The directory structure of Apache is as shown below
- Now install the latest stable version of PHP from PHP official website, http://www.php.net/. After PHP is installed, configure PHP to work with Apache HTTP server
- Now unzip our project file, which was initially placed on the desktop and put in the htdocs folder of Apache, as shown below
- After you place the project folder inside the Apache htdocs folder, restart the Apache HTTP server process
- Now we need to configure the Apache HTTP server to work with our project, i.e., open the httpd file of Apache which resides in /conf/ folder. Search for Document Root in that file and replace the path of the DocumentRoot with the path to our project, i.e., add /test/ to the existing path of the DocumentRoot
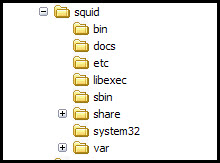
- Now setup the proxy server. I.e., install Squid proxy server in System 2. After installation you can find the Squid folder in C:\ drive as shown below
- Configure the Squid proxy server to allow request to our web server, this can be done by modifying the squid.conf file
- Now check if the Client system consists of a Firefox web browser, otherwise please install Firefox web browser
- Now configure the Firefox web browser to use Squid as its proxy server. This can be done by opening Firefox browser > Go to Tools > Options > Advanced> Click on Network tab > Click Settings button in the connection tab > Select the radio button use proxy server and Enter address of the proxy server for Address and 3128 for Port
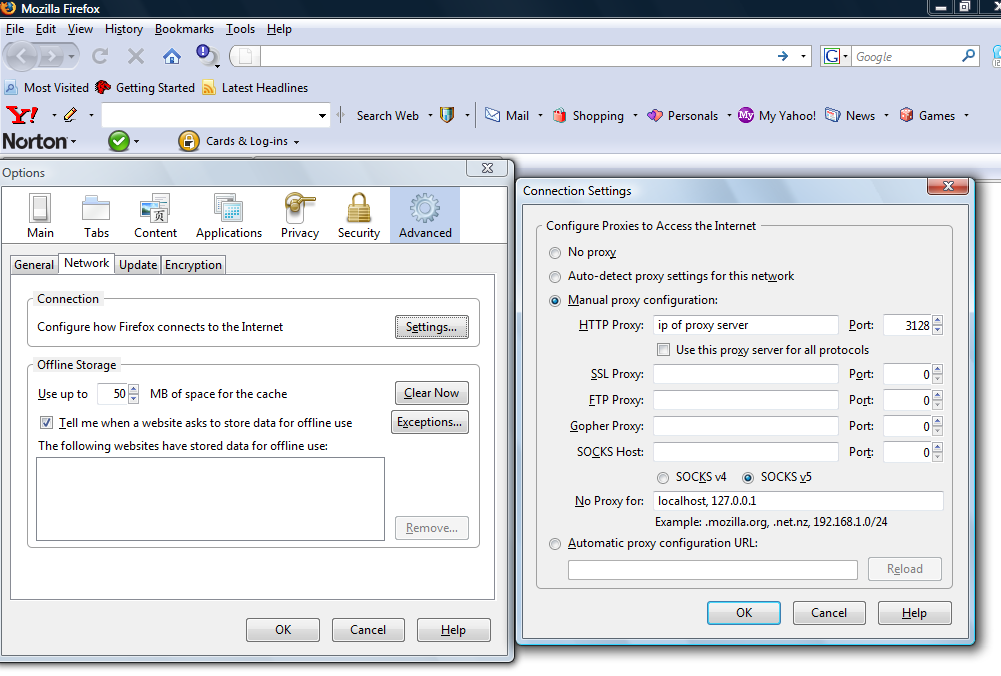
- In order to test using Firefox, install YSlow, a Firefox add-on to view the response times of the web pages. If you want to use Internet Explorer, install iMacros recorder and record the response times of the web pages using it
- Now that all the required the tools are installed, proxy server is configured to allow requests for our main server, and browser is configured to send requests to Squid proxy server we are ready to request our web pages. This can be done by using the following URI.
http://ip.of.the server//testscripts/homepage
The URI for the remaining web pages are, For page 2, http://ip.of.the server//testscripts/page2
For page 3, http://ip.of.the server//testscripts/page3
For page 4, http://ip.of.the server//testscripts/page4
Using the above steps we can successfully install the project and run the four test pages in a LAN environment. We can also record the response times of the web pages using YSlow plug-in, we have installed in the Firefox web browser.