7. Reflection and Persistence
This chapter begins with a description of the CObject class at the root of the MFC class hierarchy. The CObject class is associated with the CRuntimeClass, which supports reflection in MFC: runtime type identification, dynamic instantiation, and serialization. Several non-trivial examples of serialization are presented.
The control loop of an MFC application was already described in Chapters 1 and 5, but the details of how an MFC application is initialized have only been mentioned. We describe the details of this process in this chapter. This not only presents another example of reflection, but it also introduces the CDocTemplate class, which binds together instances of the CRuntimeClass representing the application's view and document classes. Modifying this structure is the key to creating applications with multiple view and document types. As an example of such an application, we present Brick CAD, a CAD/CAM system for designing bricks! Brick CAD supports four view types: top view, front view, side view, and control panel view.
The chapter ends with a detailed description of a simple Windows application developed in the traditional way, without using MFC. Without message maps and the Class Wizard, users must implement window procedures by hand. This serves as a good introduction to MFC message maps.
The CObject Base Class
As we saw in Chapter 1, most, but not all, of the 200-plus MFC classes appear in the MFC inheritance hierarchy:
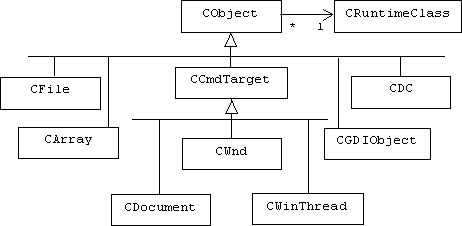
Some notable examples of classes not included in this inheritance hierarchy are locks (CSingleLock), archives (CArchive), points (CPoint), rectangles (CRect), strings (CString), and runtime classes (CRuntimeClass).
The root of the inheritance hierarchy is the CObject class, which bequeaths a pointer to an instance of CRuntimeClass to its heirs:
class
CObject
{
public:
virtual CRuntimeClass* GetRuntimeClass() const;
BOOL IsKindOf(const CRuntimeClass* pClass)
const;
virtual void Serialize(CArchive& ar);
// etc.
};
Reflection
After correctness, efficiency has traditionally been regarded as the next most important design goal, and after modularity, abstraction has traditionally been regarded as the next most important design principle. But the complexity and economics of modern commercial applications has challenged tradition to some degree. Now flexibility-the ability to easily adapt to new requirements-- is as important as efficiency. In some cases the adaptation must happen dynamically, while the program is running and runtime state information is available.
Dynamically adapting to a new requirement means some of the problems programmers solve when writing a program-which algorithm or data structure should be used-- must now be solved by the running program. But the abstraction principle asserts that how a class or function achieves its purpose should be hidden from its clients. Clearly, abstraction must be relaxed to some degree if a client must alter the behavior of a component. In addition to basic services, a reflective component allows clients to inspect and possibly change its implementation. (Components that hide their implementation from clients are called black-box components.)
The CRuntimeClass Meta-class
The purpose of the CObject base class is to provide some degree of reflection to the other classes in the MFC hierarchy. The simplest form of reflection is runtime type identification-the ability to query an object about the classes it instantiates. This presents a bit of a paradox for C++ programmers: C++ objects only exist at runtime, while C++ classes only exist at compile time. What sort of answer do we expect an object to give when asked what class it instantiates? The object-oriented view is that the answer should take the form of an object, an object representing a class.
At first, the notion of an object representing a class seems strange, but C++ objects represent application domain objects such as submarines, egg beaters, and employees, why not include C++ objects that represent solution domain objects such as classes, functions, and variables?
MFC programs represent classes as objects that instantiate the CRuntimeClass class:
struct
{
LPCSTR m_lpszClassName;
int m_nObjectSize;
CRuntimeClass* m_pBaseClass; // for statically
linked
CRuntimeClass* m_pGetBaseClass(); // for
dynamically linked
CObject* CreateObject();
BOOL IsDerivedFrom(const CRuntimeClass*
pBaseClass) const;
// etc.
} CRuntimeClass;
MFC
uses the CRuntimeClass to support three levels of reflection: runtime type
identification, dynamic instantiation, and serialization.
Runtime Type Identification
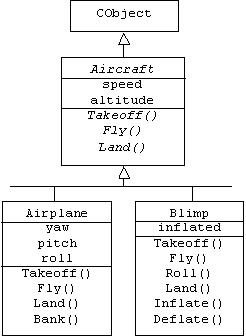
We will demonstrate the basics of reflection using a console application consisting of an Airplane and a Blimp class, both derived from an abstract Aircraft class, which in turn is derived from MFC's CObject class:
We begin by creating a project that uses MFC.
1. Create an empty Win32 Console Application called Flight.
Use the list control in the [Project]/[Settings]/[General] dialog to select
"Use MFC in a shared DLL" or "Use MFC in a Static Library".
Curiously,
the [Insert]/[New Class ...] dialog doesn't allow programmers to create an MFC
class derived from CObject. Instead, programmers must trick Visual C++ by using
this dialog to create a generic class derived from CObject.
2. From the [Insert]/[New Class ...] menu create a generic
class called Aircraft derived from CObject. A dialog box will warn that no
header file for the CObject base class can be found. Dismiss this dialog by
clicking its [OK] button.
CObject,
along with all of the other MFC classes, is defined in the <afx.h> header
file. Our console application will also require the standard I/O machinery from
the <iostream> header file.
3. Add the following include directives at the top of
Airplane.h
#include
<afx.h>
#include <iostream>
using namespace std;
The
Aircraft class is similar to the Aircraft interface discussed in Appendix 1. It
requires all derived classes to provide implementations of Takeoff(), Fly(),
and Land() member functions. In turn, these classes will inherit protected
speed and altitude member variables.
4. Add public, pure virtual Takeoff(), Fly(), and Land()
functions to the Aircraft class. Add protected member variables representing
the aircraft's speed and altitude. The constructor should initialize these
variables to zero and a virtual Display() function should display these
variables. Also, add the DECLARE_DYNAMIC macro to the class declaration.
Unfortunately,
the GetRuntimeClass() function inherited from the CObject base class doesn't
work. It must be redefined in the Aircraft class. This would seem to defeat the
purpose of deriving Aircraft from CObject, but fortunately, MFC provides two
macros that expand into the necessary declarations. The DECLARE_DYNAMIC macro:
DECLARE_DYNAMIC(Aircraft)
is
placed inside the Aircraft class declaration in the Aircraft.h file.
Copy Mechanisms
Recall that C++ automatically provides each class with a copy constructor that initializes a new class instance by making a member-wise copy of an existing class instance. Member-wise copy is also used when a variable containing an object is assigned to another. Unfortunately, CObject makes its copy constructor and assignment operator private. This can cause errors when we attempt to copy instances of classes derived from CObject. Therefore, it is common practice to add a public copy constructor and assignment operator to CObject-derived classes.
The Aircraft class can provide a public copy constructor and assignment operator for all of its derived classes. Both functions call a virtual helper function that makes a make member-wise copy of its parameter. Of course classes derived from Aircraft will need to extend this helper function.
5 Add a public copy constructor and assignment operator to
the Aircraft class. Both call a protected, virtual helper function named
Copy(), which performs a member-wise copy of its parameter.
Here
is a complete listing of the declaration:
class
Aircraft : public CObject
{
public:
DECLARE_DYNAMIC(Aircraft)
Aircraft() { altitude = speed = 0; }
virtual ~Aircraft() {}
Aircraft(const Aircraft& a) { Copy(a); }
Aircraft& operator=(const Aircraft& a);
virtual void Takeoff() = 0;
virtual void Fly() = 0;
virtual void Land() = 0;
float GetSpeed() { return speed; }
float GetAltitude() { return altitude; }
virtual void Display();
protected:
float altitude, speed;
virtual void Copy(const Aircraft& a)
{ // make a member-wise copy:
altitude = a.altitude;
speed = a.speed;
}
};
Recall
that if x and y are objects, then an assignment of the form x = y translates
into
x.operator=(y)
If z
is also an object, then a compound assignment of the form x = y = z translates
into:
x.operator=(y.operator=(z))
In
other words, the output produced by operator=() might also be its input.
Therefore, the output and input types of the overloaded assignment operator are
the same. Here is our implementation of the Aircraft assignment operator:
Aircraft&
Aircraft::operator=(Aircraft& a)
{
if (&a != this) Copy(a); // ignore x = x
return a;
}
The
DECLARE_DYNAMIC macro only expands into the necessary declarations needed to
support reflection. The IMPLEMENT_DYNAMIC macro is placed in the Aircraft.cpp
file and expands into the corresponding implementations.
6. Add the IMPLEMENT_DYNAMIC macro to the Aircraft.cpp file.
This
macro requires programmers to specify the Aircraft base class:
IMPLEMENT_DYNAMIC(Aircraft,
CObject)
Airplanes
Of course the Aircraft class is abstract and can't be instantiated. Before we can demonstrate runtime type information, we must create a concrete Airplane subclass. This class must implement all of the pure virtual member functions inherited from the Aircraft base class. Of course Airplane can implement additional member functions and provide additional member variables.
7. Repeat step 2 to add an Airplane class to the Flight
project that's derived from the Aircraft class. Add yaw, pitch, and roll member
variables that describe the plane's orientation. The constructor should
initialize these variables. Implement the inherited virtual functions. Add a
function called Bank() that rolls the plane. Don't forget to include Aircraft.h
at the top of Airplane.h
Here
is a complete listing of the Airplane class. Note that the DECLARE_DYNAMIC
macro must appear in the Airplane class declaration:
class
Airplane : public Aircraft
{
public:
DECLARE_DYNAMIC(Airplane)
Airplane() { yaw = pitch = roll = 0; }
virtual ~Airplane() {}
void Takeoff();
void Fly();
void Bank(float degrees);
void Land();
void Display();
private:
float yaw, pitch, roll;
void Copy(const Airplane& a)
{
Aircraft::Copy(a);
yaw = a.yaw;
pitch = a.pitch;
roll = a.roll;
}
};
Pending
the advise of a pilot, our implementations of the Airplane member functions
simply print diagnostic messages and adjust a few member variables.
8. Provide simple implementations for the Airplane member
functions.
Here
is an example from Airplane.cpp:
void
Airplane::Bank(float degrees)
{
cout << "An airplane is
banking\n";
roll = degrees;
}
9. Insert the IMPLEMENT_DYNAMIC macro in the Airplane.cpp
file.
IMPLEMENT_DYNAMIC(Airplane,
Aircraft)
To
build the project, we'll need a main() function that serves as a test driver.
10. Add an implementation file to the Flight project called
test.cpp. Implement a main() function in test.cpp that calls a function that
displays aircraft meta information. This function should also be defined in
test.cpp.
Dynamic
Downcasting in MFC
Our main() begins by pointing an Aircraft pointer at a newly created Airplane object. The pointer is passed to a global DisplayMetaInfo() function, which will be explained below. Next, our aircraft takes off and flies. However, before the aircraft banks, it must be downcast to an Airplane pointer. We could perform a static downcast, but recall from Appendix 1, that this will result in a runtime error if the pointer happens to point to a blimp or some other type of aircraft. To prevent this, we perform an MFC-style dynamic cast. This involves using MFC's RUNTIME_CLASS macro to create a pointer to an instance of CRuntimeClass that represents the Airplane class. This pointer is passed to the IsKindOf() member function. If the result is true, then we safely perform a static downcast and call the Bank() function:
int main()
{
Aircraft* craft = new Airplane();
DisplayMetaInfo(craft);
craft->Takeoff();
craft->Fly();
// MFC style dynamic cast:
if
(craft->IsKindOf(RUNTIME_CLASS(Airplane)))
((Airplane*)craft)->Bank(30);
else
cout << "aircraft
is not an airplane\n";
craft->Land();
return 0;
}
At
this point one might wonder why MFC doesn't simply use RTTI, the Runtime Type
Information feature that's part of the standard C++ library. This feature
supports the standard dynamic_cast<> operator. The answer is simple, MFC
pre-dates the standard C++ library. But also, runtime type identification in
MFC goes far beyond RTTI. We can already see this in the DisplayMetaInfo()
function, which extracts a pointer to a runtime class from an Aircraft pointer
using the GetRuntimeClass() member function. Using this object, we can get the
name of the class, as well as the names of all base classes:
void
DisplayMetaInfo(Aircraft* c)
{
cout << "aircraft's meta
information:\n";
CRuntimeClass* rtc = c->GetRuntimeClass();
CRuntimeClass* base =
rtc->m_pfnGetBaseClass();
CRuntimeClass* base2 =
base->m_pfnGetBaseClass();
cout << " class = " <<
rtc->m_lpszClassName << endl;
cout << " base class = "
<< base->m_lpszClassName << endl;
cout << " base of base = "
<< base2->m_lpszClassName << endl;
}
11. Build and test the application.
Here's
the output produced by main():
aircraft's
meta information:
class = Airplane
base class = Aircraft
base of base = CObject
An airplane is taking off
An airplane is flying
An airplane is banking
An airplane is landing
Dynamic
Instantiation
Sometimes programmers can't anticipate the types of objects they must create. This is especially true for framework developers who must instantiate classes that will be defined much later in customizations of the framework. In these situations programmers turn to the Factory Method design pattern:
Factory Method [Go4]
Other Names
Virtual constructor.
Problem
A "factory" class can't anticipate the class of "product" objects it must create.
Solution
Provide the factory class with an ordinary member function that creates product objects. This is called a factory method. The factory method can be a virtual function implemented in a derived class, a template function parameterized by a product constructor, or a "smart" function that constructs products from their types.
In
this context we can think of CRuntimeClass as a factory class and CObject as
the base class for all product classes. If Blimp is a class derived from
CObject, and if type points to an instance of CRuntimeClass that
represents Blimp, RUNTIME_CLASS(Blimp), then calling the factory method,
type->CreateObject(), creates a new instance of Blimp.
We can demonstrate dynamic instantiation by creating a Blimp class derived from Aircraft that supports this feature.
12. Repeat steps 6, 7, and 8 to create an Aircraft-derived
Blimp class.
Here
is a complete listing of the Blimp class. The main difference is that the
DECLARE_DYNAMIC macro is replaced by the DECLARE_DYNCREATE macro:
class
Blimp : public Aircraft
{
public:
DECLARE_DYNCREATE(Blimp)
Blimp() { inflated = TRUE; }
virtual ~Blimp() {}
void Takeoff();
void Fly();
void Deflate(float degrees);
void Inflate(float degrees);
void Land();
void Display();
private:
BOOL inflated;
void Copy(const Blimp& a)
{
Aircraft::Copy(a);
inflated = a.inflated;
}
};
Similarly,
the IMPLEMENT_DYNCREATE macro is placed in Blimp.cpp instead of the
IMPLEMENT_DYNAMIC macro:
IMPLEMENT_DYNCREATE(Airplane,
Aircraft)
The
Blimp member functions can have any implementation, as long as they are
different from the corresponding Airplane implementations:
void
Blimp::Takeoff()
{
if (inflated)
{
cout << "A blimp
is taking off\n";
speed = 50;
altitude = 500;
}
else
cout << "Blimp is
deflated!\n";
}
The
global ReflectionDemo() function is modified so that it creates a Blimp using
the CreateObject() factory method.
13. Include "Blimp.h" at the top of test.cpp.
Alter the ReflectionDemo() function so that it uses dynamic instantiation to
create a blimp.
Here
is a complete listing of the function:
void
ReflectionDemo()
{
CRuntimeClass* rtc = RUNTIME_CLASS(Blimp);
Aircraft* craft =
(Aircraft*)rtc->CreateObject();
DisplayMetaInfo(craft);
craft->Takeoff();
craft->Fly();
// MFC style dynamic cast:
if
(craft->IsKindOf(RUNTIME_CLASS(Airplane)))
((Airplane*)craft)->Bank(30);
else
cout << "aircraft
is not an airplane\n";
craft->Land();
}
14. Build and test the application.
Here
is the output that is now produced:
aircraft's
meta information:
class = Blimp
base class = Aircraft
base of base = CObject
A blimp is taking off
A blimp is flying
aircraft is not an airplane
A blimp is landing
Persistence
A persistent object is an object that can be saved to and restored from secondary memory-a file or database. Not all objects need to be persistent. Obviously objects that represent application data need to be persistent, for example we have seen that the document class of an application is often persistent, because it holds all of the application data.. On the other hand, views and other user interface components do not need to be persistent, because they can be easily recreated when the application starts. Objects that are not persistent are called transient objects.
Saving an object to a file is called serialization, because the file representation of the object is a series of bytes. Restoring an object from a file is called de-serialization.
Serializing the Transitive Closure of an Object
It may seem as though serializing an object is simply a matter of writing its member variables to a file. But some of the members might be embedded objects with member variables that are inaccessible to the outer object, while still other members might be pointers to objects.
The network of all objects that can be reached by following pointers originating in an object a is called the transitive closure of a:
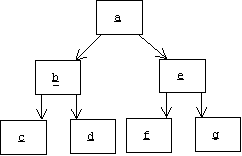
Of course the transitive closure of an object isn't necessarily a tree; it can be an arbitrary network of objects:

Saving and restoring object a to and from secondary memory actually means saving and restoring the transitive closure of a. But saving and restoring a network of objects to secondary memory poses three problems:
1. A
pointer restored from secondary memory may no longer be valid.
2. When saving a complex network of objects to secondary memory, how can we avoid saving the same object multiple times?
3. When restoring an object from secondary memory, how will memory for the objects in the transitive closure be allocated? In the example above, the memory for a might be pre-allocated, but how would anyone know to pre-allocate memory for objects b through g?
MFC
provides several persistence mechanisms that solve these problems. We are
primarily interested in archives. An archive is an MFC object that represents
an IO stream associated with a binary file.
Saving an object to an archive automatically saves the object's transitive closure. A pointer to an object of type T is translated into a pair of the form (T, OID), where OID is a unique integer called an object identifier. When (T, OID) is extracted from an archive, dynamic instantiation is used to create a new object from T. The object identifier is then translated into a pointer to this new object. Archives keep track of these translations to avoid duplicating objects. (This technique is sometimes referred to as "pointer swizzling".)
Serialization in MFC
As a simple demonstration of serialization, let's make the Blimp class persistent. Although Blimp inherits a Serialize() function from CObject, it will be our job to redefine this function.
15. Replace the DECLARE_DYNCREATE macro in the declaration
of Blimp with the DECLARE_SERIAL macro. Add a Serialize member function.
class
Blimp : public Aircraft
{
public:
DECLARE_SERIAL(Blimp)
void Serialize(CArchive& ar);
// etc.
};
Like
the Serialize() functions we have seen before, the parameter to the Blimp's
Serialize() function is a CArchive reference. Internally, the archive's
IsStoring() function is called. If this function returns true, then the blimp
is being serialized into the archive, otherwise the blimp is being
de-serialized from the archive. In the first case, the blimp's member variables
are inserted into the archive using the insertion operator. In the
de-serialization case the blimp's member variables are extracted from the
archive using the extraction operator:
void
Blimp::Serialize(CArchive& ar)
{
if (ar.IsStoring())
{
ar << altitude;
ar << speed;
ar << inflated;
}
else
{
ar >> altitude;
ar >> speed;
ar >> inflated;
}
}
16. Change main() in test.cpp so that it serializes, then
de-serializes several blimps.
Here
is the beginning of the new main():
int main()
{
Blimp b1, b2;
b1.Takeoff();
b1.Display();
b2.Takeoff();
b2.Display();
Normally,
the MFC framework automatically creates an archive for us when the user selects
the [File]/[Save], [File]/[Save As ...] or [File]/[Open] menu items. In our
example we must create our own archive. This is a two step process. First, we
must create an object representing the binary file where our blimps will be
serialized. In MFC binary files are represented by instances of the CFile
class. The constructor we use requires the name of the file and a sequence of
flags describing how the file will be opened:
UINT outFlags = CFile::modeCreate | CFile::modeWrite |
CFile:: shareDenyNone;
cout << "Serializing 2 blimps ...
\n";
CFile outFile("blimps", outFlags);
Next,
an archive associated with the address of the CFile object is created and
passed to the Serialize() functions of the two blimps:
CArchive archive1(&outFile, CArchive::store);
b1.Serialize(archive1);
b2.Serialize(archive1);
archive1.Close();
Although
de-serialization could be done by a different program, we will simply pretend
that the second half of main() is a different program that creates two Blimp
objects, a Cfile, and an archive:
cout << "Deserializing 2 blimps ... \n";
Blimp b3, b4;
UINT inFlags = CFile::modeCreate |
CFile::modeNoTruncate |
CFile::modeRead | CFile:: shareDenyNone;
CFile inFile("blimps", inFlags);
CArchive archive2(&inFile, CArchive::load);
Finally,
the blimps in the archive are de-serialized into the new blimp variables, which
are then displayed:
b3.Serialize(archive2);
b4.Serialize(archive2);
b3.Display();
b4.Display();
archive2.Close();
return 0;
}
17. Build and test the application.
Here
is the output produced:
A blimp is
taking off
altitude = 500
speed = 50
inflated = 1
A blimp is taking off
altitude = 500
speed = 50
inflated = 1
Serializing 2 blimps ...
Deserializing 2 blimps ...
altitude = 500
speed = 50
inflated = 1
altitude = 500
speed = 50
inflated = 1
Notice
that although the default Blimp constructor creates blimps b3 and b4 with
initial altitude and speed set to zero, these blimps have the non-zero speeds
and altitudes of blimps b1 and b2 after de-serialization.
Database Browsers
A database browser is a program that allows users to create, modify, browse, search, and delete persistent collections of data records. For example, an address book browser allows users to create, modify, browse, and delete address books. Each book is a persistent collection of person records. A person record contains the name, address, and phone number of a person.
A view of an address book is a form with a list box showing the names of all people in the associated book. The highlighted name in the list box is the selected entry. The name, address, and phone number of the selected entry are displayed in labeled text boxes:
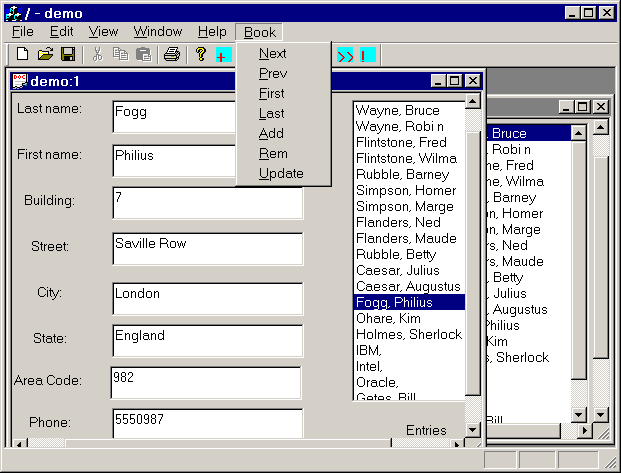
Users can change the selected entry by double-clicking on any name in the list box. The associated address book can be searched by using [Book] menu commands to change the selected entry to the next, previous, first, or last names in the list box. The selected entry can be removed from the book by selecting [Rem] from the [Book] menu. In this case the previous name becomes the selected entry. Users can type new information into the text boxes, then select either the [Add] or [Update] entries from the [Book] menu. Selecting [Add] uses the information stored in the text boxes to create a new Person record, which becomes both the selected and last entry in the book. Selecting [Update] uses the information stored in the text boxes to modify the corresponding fields of the selected entry. Of course there are toolbar buttons and hot keys that duplicate the menu commands, and of course different views of the same address book may have different selected entries.
Finally, users can use the [Save] and [Save As...] items on the [File] menu to save address books to files with a .abk extension, and the [Open] item to load address books from .abk files.
Design of the Browser (copy semantics version)
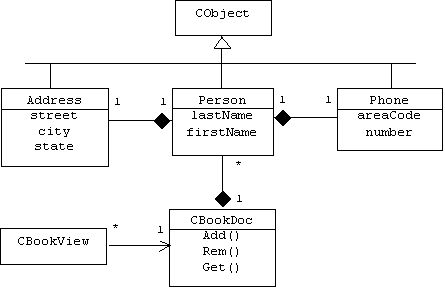
Our design instantiates MFC's Document-View architecture. An address book is a document that "owns" a sequence of Person objects. Each Person object "owns" an Address object and a Phone object. Persons, addresses, phone numbers, and documents must be persistent and therefore must be derived from MFC's CObject class.
One interesting design choice is how the phrase "a owns b" should be interpreted. There are two possibilities: "a contains b" or "a contains a pointer to b". The first interpretation is easier to program, but produces systems where multiple C++ objects represent a single real world object. For example, if an address book contains two people who happen to be roommates, then the corresponding Person objects will contain their own Address and Phone objects, even though these objects represent the same address and phone in the real world. This can lead to synchronization problems. For example, if the roommates change their phone number, then the user must remember to modify both Phone objects.
UML uses the term "composite" to refer to an object that contains its components as embedded objects, and the term "aggregate" to refer to an object that contains pointers or references to its components. Recall from Appendix1 that an association between a composite and its component is an association arrow with a solid diamond on the composite end. An association between an aggregate and its component is similar, except a hollow diamond appears on the aggregate end.
Although potentially inefficient and confusing, interpreting associations as compositions leads to an easier implementation, so we begin with it. Here is our design in the form of a class diagram:
Implementation of the Browser
The browser has much in common with the stack calculator developed in Chapter 3 (as well as many of the programs developed in the problem section of Chapter 3). In both cases the document manages a collection of objects: a stack of rational numbers or an array of persons. In both cases views of the document allow use a list control to show all members of the collection, and a text box to show the "selected" member of the collection. In the case of the stack the selected member is always the top member.
The MFC App Wizard allows us to set the extension of all data files created by the application. (We use the [Advanced Options] dialog to do this.) This creates an entry in the Window's registry, so each time the user double clicks on a file with a .adb extension, the address book browser will automatically be start and load the file.
1. Use the MFC App Wizard to create a multi-document project
called "Book". On the [Step 4 of 6] dialog click the [Advanced ...]
button. Type "abk" in the [File extension] edit box of the [Advanced
Options] dialog box, then click the [Close] button. On the [Step 6 of 6] dialog
select CFormView as the base class of CBookView.
Addresses,
Phones, and Persons
The Address, Person, and Phone classes must be persistent. We will follow the same procedure we used earlier to make the Blimp class persistent.
2. Use the [Insert]/[New Class] dialog to insert a generic
class called Address into the Book project. Specify [CObject] as the base
class. Include <afx.h> at the top of Address.h. Add fields to the class
to hold the building number, street, city, state, and zip code of an address.
Following the Blimp example, make Address serializable. Follow the same steps
to create a Phone and Person classes. Be sure to include Address.h and Phone.h
at the top of Person.h
Recall
the seven steps required to make a class persistent:
1. Derive
the class from CObject.
2. Include <afx.h> in the header file.
3. Place the DECLARE_SERIAL macro in the class declaration
4. Place the IMPLEMENT_SERIAL macro in the source file.
5. Provide default and copy constructors.
6. Provide an assignment operator.
7. Provide a Serialize() function.
Here
is a listing of the Person class. Completion of the Address and Book classes is
left as an exercise, as are the implementations of most of the routine Address
book member functions.
class
Person : public CObject
{
public:
DECLARE_SERIAL(Person)
Person(Address a, CString f, CString l, Phone
p)
:first(f), last(l), address(a), phone(p) {}
Person();
Person(const Person& p) { Copy(p); }
Person& operator=(Person& x);
virtual ~Person() {}
void Serialize(CArchive& ar);
// getters:
Address GetAddress() const { return address; }
// etc.
// setters:
void SetAddress(
int bld, CString st, CString
c, CString ste, int z); // etc.
private:
CString first, last; // name
Phone phone;
Address address;
void Copy(const Person& p);
};
Notice
that every Person object will have embedded Phone and Address objects rather
than pointers to Phone and Address objects.
The Person class provides a copy constructor and an assignment operator. Recall that these functions overwrite the corresponding functions made private in the CObject base class. As such, it will be sufficient for both functions to make a member-wise copy of their argument. This is done by the private Copy() function.
The Serialize function needs to serialize and de-serialize the name, address, and phone. Of course the Phone and Address member variables are private, hence inaccessible to Person. Therefore, the Person object must ask its embedded Phone and Address objects to serialize and de-serialize themselves. This is done by simply passing the archive parameter to the phone and address Serialize() functions.
void
Person::Serialize(CArchive& ar)
{
if (ar.IsStoring())
{
ar << first;
ar << last;
}
else
{
ar >> first;
ar >> last;
}
phone.Serialize(ar);
address.Serialize(ar);
}
The
Document
CBookDoc, the browser's document class, manages a dynamic array of Person objects. It's worth noting that the array literally contains Person objects rather than pointers to Person objects.
5. Include <afxtempl.h> and "Person.h" at
the top of BookDoc.h. Add a CArray of Person objects to the CBookDoc class. Add
functions for adding, removing, getting, and updating Person objects in the
CArray. Set the size of the CArray to 0 in the constructor.
Here
is a partial listing of the CBookDoc class:
class
CBookDoc : public CDocument
{
CArray<Person, Person> book;
public:
void Add(Person p);
void Rem(int pos);
Person GetPerson (int pos) const { return
book.GetAt(pos); }
void Set(int pos, CString fn, CString ln,
Address a, Phone ph);
int GetSize() const { return book.GetSize(); }
// etc.
};
The
CArray template arguments are both Person. In other words, the CArray holds
Person objects, and the CArray member functions pass Person arguments by value.
This simply reflects our decision to avoid pointers.
The Rem(), Add(), and Set() functions modify the CArray, and so must set the inherited modified flag to true, and must notify all registered views of the change.
void
CBookDoc::Set(
int pos, CString fn, CString ln, Address a,
Phone ph)
{
if (0 <= pos && pos <
book.GetSize())
{
book[pos].SetFirst(fn);
book[pos].SetLast(ln);
book[pos].SetAddress(a);
book[pos].SetPhone(ph);
SetModifiedFlag(TRUE);
UpdateAllViews(NULL);
}
}
In
theory, a CArray of CObjects should know how to serialize itself, and so the
document's Serialize() function simply passes its archive argument to the
CArray's Serialize() function:
void
CBookDoc::Serialize(CArchive& ar)
{
book.Serialize(ar);
}
6. Specialize the global SerializeElements() template
function.
The
CArray Serialize() function calls the global SerializeElements() function.
Given a pointer, p, to the first element in a CArray, this function traverses
the CArray, calling the Serialize() function of each element. Of course this
function is a template function parameterized by the type of object p points
to. Unfortunately, this function is too general. We need to specialize the
function. In other words, we must define a version of the function in which the
template parameter is set to the Person class. C++ has a special syntax for
doing this:
template
<>
void AFXAPI SerializeElements <Person> (
CArchive& ar, Person* p, int size)
{
for (int i = 0; i < size; i++, p++ )
p->Serialize( ar ); //
serialize each element
}
The
View
7. Use the dialog editor to create the book view form. (Use
the snapshot given earlier as a model.) Use the [View]/[Class Wizard]/[Member
Variables] dialog to create CBookView member variables associated with the text
boxes. Use the [Class Wizard]/[Message Maps] to add an OnUpdate() function to
the CBookView class. Add an integer member variable called position to the
CBookView class. This variable should be initialized to 0 by the constructor
and represents the position of the selected entry in the associated address
book.
When
the user adds, removes, or changes a person from the document, the
UpdateAllViews() functions is called after the document has been modified. Recall
that this function calls the OnUpdate() function of each associated view.
OnUpdate() converts the identifier of the list box control into a temporary
CListBox wrapper, uses this wrapper to place the names of each person in the
list box, then calls a private helper function named SetBoxes():
void
CBookView::OnUpdate(
CView* pSender, LPARAM lHint, CObject* pHint)
{
CListBox* pLB = (CListBox*)
GetDlgItem(IDC_BOOK);
pLB->ResetContent();
CBookDoc* pDoc = GetDocument();
int size = pDoc->GetSize();
for(int i = 0; i < size; i++)
{
pLB->InsertString(-1,
pDoc->GetPerson(i));
}
SetBoxes();
}
SetBoxes()
places the name, address, and phone of the selected person in the text boxes,
then highlights the name of the selected person. Using the Class Wizard, we
created view member variables corresponding to the view's text boxes: m_first,
m_last, m_city, etc. The name, phone, and address of the selected person are
copied into these variables, then UpdateData(FALSE) is called. Recall that this
transfers the data stored in these variables into the corresponding text boxes:
void
CBookView::SetBoxes()
{
CBookDoc* pDoc = GetDocument();
if (0 < pDoc->GetSize())
{
Person p =
pDoc->GetPerson(position);
m_last = p.GetLast();
m_first = p.GetFirst();
Address a = p.GetAddress();
Phone ph = p.GetPhone();
m_bldg = a.GetBuilding();
m_street = a.GetStreet();
m_state = a.GetState();
m_city = a.GetCity();
m_phone = ph.GetNumber();
m_areaCode =
ph.GetAreaCode();
CListBox* pLB = (CListBox*)
GetDlgItem(IDC_BOOK);
pLB->SetCurSel(position);
UpdateData(FALSE);
}
}
User
input comes through a special [Book] menu, with corresponding toolbar buttons
and hot keys.
8. Use the menu editor to create a [Book] menu
containing entries labeled Add, Rem, Update, Next, Prev,
First and Last. Use the [Class Wizard] to add handlers and
disablers for the items to the CBookView class.
When
the user selects [Next] from the [Book] menu, the view's OnBookNext() function
is called. This function simply increments the view's position variable by one
modulo the number of entries in the book.
void
CBookView::OnBookNext()
{
CBookDoc* pDoc = GetDocument();
int size = pDoc->GetSize();
if (0 < size)
{
position = (position + 1) %
size;
SetBoxes();
}
}
Recall
that before a menu is displayed, an UPDATE_COMMAND_UI message is sent to each
menu item. The handler for this message can modify the appearance of the item.
In our case, the user shouldn't be able to do anything to an empty address book
except add a new entry:
void
CBookView::OnUpdateBookNext(CCmdUI* pCmdUI)
{
CBookDoc* pDoc = GetDocument();
if (!pDoc->GetSize())
pCmdUI->Enable(FALSE);
}
When
the user selects [Add] from the [Book] menu, the handler uses UpdateData(TRUE)
to transfer the data from the text boxes into the corresponding view member
variables. This data is used to construct a Person object. The object is added
to the document (which will update all of the views), the position is updated,
and SetBoxes() is called:
void
CBookView::OnBookAdd()
{
UpdateData(TRUE);
Address a(m_bldg, m_street, m_city, m_state);
Phone ph(m_areaCode, m_phone);
Person p(a, m_first, m_last, ph);
CBookDoc* pDoc = GetDocument();
pDoc->Add(p);
position = pDoc->GetSize() - 1;
SetBoxes();
}
The
remaining handler functions are similar and are left as an exercise for the
reader. To finish, we only need to handle double clicking in the list box.
9. Use the Class Wizard to add to the view class a handler
for the LBN_DBL_CLK message that is sent to the list box when the user double
clicks on an entry. (Select the list box's identification number in the [Object
IDs:] list box to see this message.) Implement this handler.
void
CBookView::OnDblclkBook()
{
CListBox* pLB = (CListBox*)
GetDlgItem(IDC_BOOK);
position = pLB->GetCurSel();
SetBoxes();
}
11. Build and test the application.
Version
2: Using Reference Semantics
Version 2 of the Address Book Browser uses pointers to rather than copies of objects. The overall design is the same, except that aggregation associations replace the composition associations.
We begin by modifying the Person class so that it encapsulates pointers to the associated Phone and Address objects:
class
Person : public CObject
{
public:
DECLARE_SERIAL(Person)
Person(Address* a, CString f, CString l, Phone*
p)
:first(f), last(l), address(a), phone(p) {}
Person();
Person(const Person& p) { Copy(p); }
Person& operator=(Person& x);
virtual ~Person() { Free(); }
void Serialize(CArchive& ar)
// getters:
CString GetName() const { return last + ",
" + first; } // etc.
// setters:
void SetAddress(Address* a) { address = a; } //
etc.
private:
CString first, last;
Phone* phone;
Address* address;
void Copy(const Person& p);
void Free();
};
The
Serialize function uses the extraction and insertion operators to read and
write its Address and Phone pointers. This is where the archive will use the
pointer swizzling trick to read and write pointers. Memory for the Phone and
Address objects will automatically be allocated by the extraction operator.
(The IMPLEMENT_SERIAL macro provides the extraction and insertion operator for
pointers.)
void
Person::Serialize(CArchive& ar)
{
CObject::Serialize(ar);
if (ar.IsStoring())
{
ar << first;
ar << last;
ar << phone;
ar << address;
}
else
{
ar >> first;
ar >> last;
ar >> phone;
ar >> address;
}
}
Orthodox
Canonical Form
The private Free() function called by the destructor deletes the associated phone and address objects:
void
Person::Free()
{
if (address) delete address;
if (phone) delete phone;
}
We
need to be careful here. The original motivation for using reference semantics
was to allow roommates to share the same Address and Phone objects. If one of
the roommates is deleted from the address book, then his destructor will
automatically delete the phone and address of the remaining roommate. However,
in our example we won't actually be sharing Address and Phone objects. Like
version one, each person must be responsible for the creation and destruction
of his associated Phone and address objects.
To avoid aliasing problems, the Copy() function creates new Address and Phone objects on the heap that are clones of its parameter's Address and Phone objects:
void
Person::Copy(const Person& p)
{
first = p.first;
last = p.last;
phone = new Phone(*p.phone);
address = new Address(*p.address);
}
The
assignment operator also requires a slight modification. Instead of simply
copying its parameter, it must first delete its former Address and Phone
objects by calling the Free() function:
Person&
operator=(Person& x)
{
if (&x != this)
{
Free();
Copy(x);
}
return x;
}
When
a class contains pointers to private objects, then it must redefine its
destructor, copy constructor, and assignment operator in exactly the way we
have done. Of course the implementations of the Copy() and Free() helper
functions will vary from case to case. This is an example of the Orthodox
Canonical Form design pattern:
Orthodox Canonical Form [COP], [HORST], [PEA]
Problem
When using the Wrapper-Body design pattern in C++, copying the wrapper fails to copy the associated body, and deleting the wrapper fails to delete the associated body. This can lead to memory leaks and aliasing bugs.
Solution
Provide the wrapper with a destructor that deletes the body. Redefine the wrapper's copy constructor so that it clones the body of its argument. Redefine the wrapper's assignment operator so that it first deletes its old body, then clones its argument's body.
Type
Safe Pointer Containers
Unfortunately, MFC's CArray , CList, and CMap templates don't work well with pointers. MFC does provide an archaic CObArray class that manages a dynamic array of CObject pointers, but of course CObArray doesn't guarantee that all of its members are pointers to the same subclass of CObArray. For example, it's possible to create a CObArray that holds a pointer to an Address, a pointer to a Phone, and a third pointer to a Person. This might be what the programmer intended, but in other situations it can lead to runtime errors.
MFC now has a CTypedPtrArray template that provides a type safe wrapper for CObArray and makes it behave more like CArray:
CTypedPtrArray<Body,
Storable>
The
first parameter is the type of the body: CObArray or CPtrArray. The second
argument is the type of elements that will be stored in the array.
MFC also provides CTypedPtrList and CTypePtrMap templates for lists anbd maps that store pointers.
Changes to Document
We modify the declaration of the private book member variable so that it now becomes a CTypedPtrArray of Book pointers. Of course we need to change the parameters and return values of a few member functions so that they deal with Person pointers instead of Person objects:
class
CBookDoc : public CDocument
{
CTypedPtrArray<CObArray, Person*> book;
public:
void Add(Person* p);
void Rem(int pos);
Person* GetPerson (int pos) const { return
book.GetAt(pos); }
void Set(int pos, Address* a, CString fn,
CString ln, Phone* ph);
int GetSize() const { return book.GetSize(); }
// etc.
};
Changes
to the View
We also need to change view references to Address, Phone, and Person objects to references to Address, Phone, and Person pointers. as an example, the [Book]/[Add] menu handler now must create Address, Phone, and Person objects on the heap. The Person pointer is passed to the document's Add() function:
void
CBookView::OnBookAdd()
{
UpdateData(TRUE);
Address* a = new Address(m_bldg, m_street,
m_city, m_state);
Phone* ph = new Phone(m_areaCode, m_phone);
Person* p = new Person(a, m_first, m_last, ph);
CBookDoc* pDoc = GetDocument();
pDoc->Add(p);
position = pDoc->GetSize() - 1;
SetBoxes();
}
Initializing
an MFC Application
In Chapter 5 we introduced CWinApp, the base class of the master user interface thread for a typical MFC application. Recall that when we use the MFC App Wizard to create an application named Test, a subclass of CWinApp is automatically generated:
class
CTestApp : public CWinApp
{
public:
CTestApp();
virtual BOOL InitInstance(); // make frame,
view, & doc
afx_msg void OnAppAbout(); // handler for
Help/About menu item
// etc.
};
In
addition, an instance of this class is declared:
CTestApp
theApp;
The
application begins by calling AfxWinMain():
int
AfxWinMain(...)
{
CWinApp* pApp = AfxGetApp(); // = &theApp
if (!hPrevInstance) // if first run
pApp->InitApplication();
// register window
pApp->InitInstance(); // create frame,
document, & view
return pApp->Run(); // message loop
}
The
call to InitApplication() creates an initial entry for the application in the
system registry. The call to InitInstance() creates the application's document
and view. The call to Run() starts the message pump.
The AppWizard generates an override of the InitInstance() function. This function uses a document template to group the application's document, view, and main frame classes. The template is then added to a list of document templates managed by theApp:
BOOL
CTestApp::InitInstance()
{
// etc.
CSingleDocTemplate* pDocTemplate;
pDocTemplate = new CSingleDocTemplate(
IDR_MAINFRAME,
RUNTIME_CLASS(CTestDoc),
RUNTIME_CLASS(CMainFrame), // main SDI frame window
RUNTIME_CLASS(CTestView));
AddDocTemplate(pDocTemplate);
// Parse command line for standard shell commands, DDE, file open
CCommandLineInfo cmdInfo;
ParseCommandLine(cmdInfo);
//
Dispatch commands specified on the command line
if
(!ProcessShellCommand(cmdInfo)) return FALSE;
// window
has been initialized, so show and update it.
m_pMainWnd->ShowWindow(SW_SHOW);
m_pMainWnd->UpdateWindow();
return TRUE;
}
CSingleDocTemplate
and CMultiDocTemplate are derived from the CDocTemplate class, which
encapsulates three protected CRuntimeClass pointers:
class
CDocTemplate : public CCmdTarget
{
public:
virtual CDocument* CreateNewDocument();
virtual CFrameWnd* CreateNewFrame(CDocument*
pDoc,
CFrameWnd* pOther);
virtual CDocument* OpenDocumentFile(...) = 0;
// etc.
protected:
CRuntimeClass* m_pDocClass;
CRuntimeClass* m_pFrameClass;
CRuntimeClass* m_pViewClass;
};
InitInstance()
creates a document template holding pointers to objects representing CTestDoc,
CMainFrame, and CTestView, then adds the document template to a list of
templates managed by theApp.
The following class diagram shows the relationship between these classes:

Although an application could have many document templates, it is more common to have one.
InitInstance() indirectly calls the OpenDocumentFile() member function of the first document template on its list:
pTemplate->OpenDocumentFile(NULL);
This
function (eventually) creates the application's main frame, initial document,
and initial view using the dynamic instantiation feature discussed earlier:
CDocument*
pDocument = (CDocument*)m_pDocClass->CreateObject();
CFrameWnd* pFrame =
(CFrameWnd*)m_pFrameClass->CreateObject();
CWnd* pView = (CWnd*) m_pNewViewClass->CreateObject();
Dynamic
instantiation is used because the framework can't anticipate the types of
document and views we will create until we run the App Wizard.
Applications with Multiple Document and View Types
While a multi-document application allows users to open multiple views of multiple documents, the documents are generally all instances of the same CDocument-derived class, and the views are generally all instances of the same CView-derived class. But what if an application requires multiple types of documents and views? For example, workspaces, projects, and C++ files can be viewed as three distinct types of documents users may edit in Visual C++. While Microsoft Word only allows users to edit a single type of document, users may view their documents using three different types of views: normal, outline, and page layout.
It's not too difficult to create MFC applications with multiple view and document types. The trick is to edit InitInstance() by adding the creation and installation of additional document templates.
Brick CAD
CAD/CAM stands for "Computer Aided Design/Computer Aided Manufacturing". CAD/CAM systems are used by engineers to design everything from spark plugs to skyscrapers. In this context the object being designed is the document. Engineers can create and modify different types of views of the document, such as two dimensional cross section views, three dimensional wire frame views, three dimensional solid surface views, statistical views, schematics, blueprints, even views of individual document components.
Brick CAD is a CAD/CAM system for designing bricks. Of course no one would really need a CAD/CAM system for designing bricks, because bricks are pretty simple. They have height, width, length, area, volume, and that's about it. We could have developed a CAD/CAM system for designing nuclear submarines, but then we would need to actually know something about submarines.
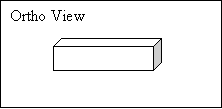
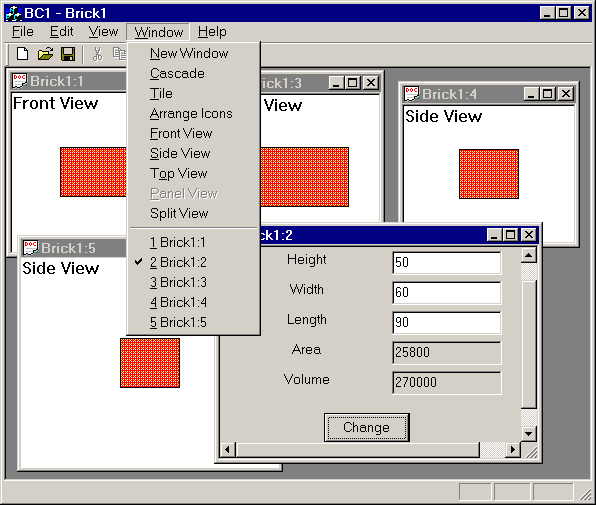
A Brick CAD document represents a single brick with height, width, length, area, and volume attributes. Users can open four types of views of a brick: side view, top view, front view, and a control panel view that displays the attributes of the brick in edit boxes:
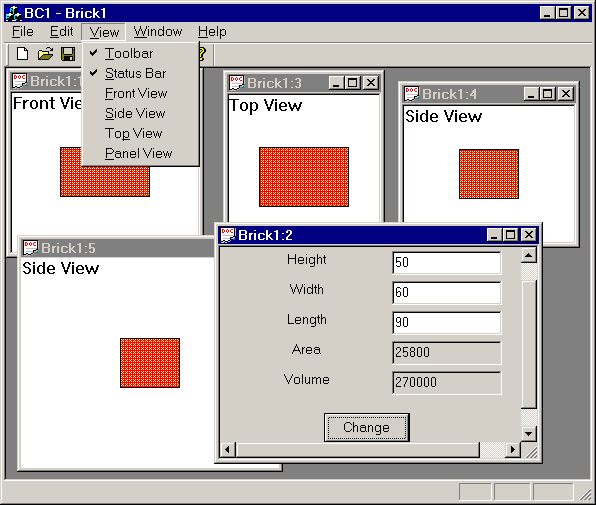
A Brick CAD user can use the panel view to change the height, width, or length of the associated brick. When the [Change] button is clicked, all open views that are affected by the change automatically redraw themselves. (Some views do not need to redraw themselves. For example, a top view doesn't need to redraw itself if the user changes the height of the brick.) Naturally, bricks can be saved to and restored from files using MFC's serialization mechanism.
Users can open new views by selecting either [Side View], [Front View], [Top View], or [Panel View] items from the [View] menu.
Design of Brick CAD
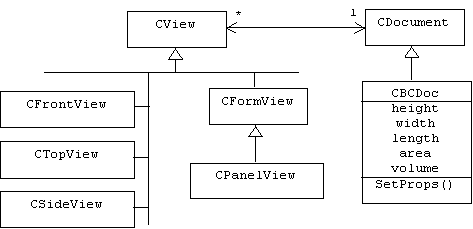
Brick CAD is a multi-document application. The document class encapsulates the attributes of a single brick. These attributes can be changed using the SetProps() function, which notifies all registered views by calling UpdateAllViews(). Of course there are four types of CView-derived classes:
Version 1.0: Dedicated Windows
Version 1.0 of Brick CAD has already been described. Users are allowed to open new types of views by selecting items from the [View] menu.
Implementation
Begin by creating a workspace and a project.
1. Use the [File]/[New]/[Workspace] dialog to create a new
workspace named BC (Brick CAD).
2. Use the MFC App Wizard to add a new, multi-document project to the BC workspace called BC1. Click the [Advanced] button in the [Step 4 of 6] dialog to open the [Advanced Options] dialog box. Type bc1 into the [File extension] edit box. Type Brick CAD in the [Main frame caption:] edit box. Type Brick in the [Doc type name:] edit box, then click the [Close] button. In the [Step 6 of 6] dialog type make sure CBC1View is the selected class, then type CFrontView in the [Class name] edit box.
Implementing
the Brick CAD document
The Brick CAD document encapsulates the height, width, length, volume, and area of a single brick.
3. Add five, private, integer member variables to the
CBC1Doc class named height, width, length, area, and volume. Provide public
"getter" functions for each variable. Provide a private function
named CalcProps() that computes the area and volume from height, width, and
length. The default constructor should initialize width, height, and volume to
100, 150, and 200, respectively. The constructor should initialize area and
volume by calling CalcProps(). Use #define to create a color reference named
BRICK_COLOR.
The
color of a brick is defined for all views at the top of the CBC1Doc.h file:
#define
BRICK_COLOR RGB(255, 80, 50)
Users
don't directly set the volume and area of a brick. Instead, these are
automatically computed from height, width, and length by a private member
function:
void
CBC1Doc::CalcProps()
{
volume = length * height * width;
area = 2 * (length * (width + height) + width *
height);
}
The
Serialize() function only needs to save the height, width, and length of a
brick. When these values are de-serialized, the CalcProps() function is called
to compute the remaining attributes. Although it doesn't save us much disk
space for Brick CAD documents, it does demonstrate a general principle: don't
save data that can be re-computed.
4. Implement Serialize() so that it inserts height, width,
and length into the archive during a store, and extracts them during a load.
After the extraction, call CalcProps() to restore the values of area and
volume.
Here
is a listing of the Serialize() function:
void
CBC1Doc::Serialize(CArchive& ar)
{
if (ar.IsStoring())
{
ar << height;
ar << width;
ar << length;
}
else
{
ar >> height;
ar >> width;
ar >> length;
CalcProps();
}
}
Changing
properties is done by calling SetProps(), which calculates area and volume,
sets the modified flag, then updates all of the views.
5. Add a public member function to BC1Doc called SetProps().
SetProps() takes a new height, width, and length as parameters, and assigns
them to the corresponding member variables. CalcProps() is called to set area
and volume, set the modified flag to true, and update all of the views.
Here
is a listing of the SetProps() function:
void
CBC1Doc::SetProps(int len, int wth, int ht)
{
if (len <= 0 || wth <= 0 || ht <= 0)
throw CString("non-positive
dimension detected");
length = len;
width = wth;
height = ht;
CalcProps();
SetModifiedFlag(TRUE);
UpdateAllViews(NULL);
}
Implementing
the Front View
We changed the name of the view class to CFrontView in the App Wizard. We can use its implementation as a template for the side and front views.
6. Implement CFrontView's OnDraw() function so that it draws
a BRICK_COLOR rectangle in the center of the client rectangle. The dimensions
of the rectangle should be the height and length of the associated document.
Build and test the application. Also, use the Class Wizard to add an OnUpdate()
member function to this class. This function simply calls Invalidate().
The
OnDraw() function creates a new brush using the BRICK_COLOR color, then draws a
rectangle using the length and height from the associated document:
void
CFrontView::OnDraw(CDC* pDC)
{
CBC1Doc* pDoc = GetDocument();
ASSERT_VALID(pDoc);
CBrush *oldBrush, *newBrush;
newBrush = new CBrush(BRICK_COLOR);
oldBrush = pDC->SelectObject(newBrush);
pDC->TextOut(0, 0, "Front View");
CRect cliRect;
GetClientRect(&cliRect);
int length = pDoc->GetLength();
int height = pDoc->GetHeight();
int ulx = cliRect.CenterPoint().x - length/2;
int uly = cliRect.CenterPoint().y - height/2;
pDC->Rectangle(ulx, uly, ulx + length, uly +
height);
pDC->SelectObject(oldBrush);
delete newBrush;
}
Adding
Additional CView-derived Views
We follow the same pattern for the top and side view classes.
7. Use the [Insert]/[New Class ...] dialog to add new MFC
classes called CSideView and CTopView to the BC1 project, both of these classes
should be derived from CView. Implement the CSideView OnDraw() function to draw
a rectangle using the width and height of the associated document. Implement
the CTopView OnDraw() function to draw a rectangle using the length and width
of the associated document. Use the Class Wizard to add an OnUpdate() function
that calls Invalidate() to each class. (Be sure to include
"CBC1Doc.h" at the top of SideView.h and Topview.h files.)
The
top view's OnDraw() function uses the length and width of the associated
document"
void
CTopView::OnDraw(CDC* pDC)
{
CBC1Doc* pDoc = (CBC1Doc*)GetDocument();
ASSERT_VALID(pDoc);
CBrush *oldBrush, *newBrush;
newBrush = new CBrush(BRICK_COLOR);
oldBrush = pDC->SelectObject(newBrush);
pDC->TextOut(0, 0, "Top View");
CRect cliRect;
GetClientRect(&cliRect);
int length = pDoc->GetLength();
int width = pDoc->GetWidth();
int ulx = cliRect.CenterPoint().x - length/2;
int uly = cliRect.CenterPoint().y - width/2;
pDC->Rectangle(ulx, uly, ulx + length, uly +
width);
pDC->SelectObject(oldBrush);
delete newBrush;
}
Creating
and Installing Additional Templates
8. Include SideView.h and TopView.h at the top of the BC1.h
file. Add CMultiDoc pointer member variables to the CBC1App class named
frontTemp, topTemp, and sideTemp. Initialize these variables in CBC1App's
InitInstance() function, and pass them to the AddDocTemplate() function.
The
InitInstance() function is implemented in BC1.cpp. Replace the creation and
installation of the local variable, pDocTemplate, by the following lines
of code:
frontTemp
= new CMultiDocTemplate(
IDR_BRICKTYPE,
RUNTIME_CLASS(CBC1Doc),
RUNTIME_CLASS(CChildFrame),
RUNTIME_CLASS(CFrontView));
AddDocTemplate(frontTemp); // add template to template
manager
Initialize
and install the topTemp and sideTemp member variables in the same
way.
Dynamically Creating New Views
The [View] menu handlers are view-independent, hence are implemented in the CMainFrame class.
9. Use the Menu Editor to add three new items under the
[View] menu of the IDR_BRICKTYPE menu bar: [Front View], [Top View], and [Side
View]. Use the Class Wizard to add handlers for these items to the CMainFrame
class. Each handler should use the corresponding template pointer member
variable of the CBC1App class to create and update a new frame associated with
the document associated with the currently active view. (Remember, there may be
several brick documents that are currently open for editing.)
Each
menu handler creates a new view using the appropriate template from the CBC1App
class. The view is associated with the document associated with the active
view. For example, here is the implementation of the [View]/[Front] handler.
void
CMainFrame::OnViewFrontview()
{
CMDIChildWnd* pActiveChild = MDIGetActive();
CDocument* pDocument =
pActiveChild->GetActiveDocument();
CDocTemplate* pTemplate =
((CBC1App*) AfxGetApp())->frontTemp;
CFrameWnd* pFrame =
pTemplate->CreateNewFrame(pDocument, pActiveChild);
pTemplate->InitialUpdateFrame(pFrame,
pDocument);
}
Creating
A CFormView-derived View
After we layout the panel view in the Dialog Editor, the Class Wizard automatically creates the corresponding wrapper class.
10. (a) Use the [Insert]/[Resource ...] menu to display the
[Insert Resource] dialog. Use this dialog to insert a new IDD_FORMVIEW
dialog. Use the Dialog Editor to layout the new dialog using the screen
snapshot shown earlier as a model.
(b) Invoke the Class Wizard from the shortcut menu of the dialog box. You will be warned that no wrapper class exists that corresponds to this dialog. Click the [New Class] radio button. In the following dialog box specify CPanelView as the name of the class, and specify CFormView as the base class.
(c) Following the earlier examples, add a new CMultiDocTemplate pointer named panelTemp to the CBC1App class. Initialize and install this pointer in InitInstance(). Use the Menu Editor to add [Panel View] to the [View] menu. Use the Class Wizard to add a handler for this item to the CMainFrame class, and implement it following the earlier example. Build and test.
While
the Class Wizard is visible, we add member variables and a button handler.
11. Use the [Class Wizard]/[Member Variables] dialog to add
integer member variables to the CPanelView class that correspond to the control
panel's edit boxes. Use the [Class Wizard]/[Message Maps] dialog to add a
BN_CLICKED handler for the [Change] button and an OnUpdate() member function.
Implement these functions (see below). Build and test.
Assume
the button handler is called OnChange and the edit box member variables are
called m_height, m_width, m_length, m_area, and m_volume. Here's
the implementation:
void
CPanelView::OnChange()
{
UpdateData(TRUE);
CBC1Doc* pDoc = (CBC1Doc*)GetDocument();
pDoc->SetProps(m_length, m_width, m_height);
}
The
OnUpdate() function copies the document attributes to the panel view member
variables, then uses the dynamic dialog exchange mechanism discussed in Chapter
2 to display the values.
void
CPanelView::OnUpdate(
CView* pSender, LPARAM lHint, CObject* pHint)
{
CBC1Doc* pDoc = (CBC1Doc*)GetDocument();
m_area = pDoc->GetArea();
m_volume = pDoc->GetVolume();
m_height = pDoc->GetHeight();
m_length = pDoc->GetLength();
m_width = pDoc->GetWidth();
UpdateData(FALSE);
}
Version
1.1: Brick CAD with Changeable Views
Version 1.1 of Brick CAD allows users to change the view displayed by an existing view window by selecting the view type from the [Window] menu.
Implementation
Changing the view displayed by an existing view window must be done by the child frame that surrounds the active view.
12. Add [Top View], [Side View], [Front View], and [Panel
view] items to the [Window] menu of the IDR_BRICKTYPE menu bar. Use the Class
Wizard to create handlers for the COMMAND and UPDATE_COMMAND_UI messages sent
by these items. These handlers should be added to the CChildFrame class.
Implement these handlers. (See below.)
Each
menu handler simply calls the private SwitchViews() member function.
void
CChildFrame::OnWindowFrontview()
{
SwitchViews(RUNTIME_CLASS(CFrontView));
}
We
use runtime type identification to identify the type of view surrounded by a
child frame. This information is used to disable the corresponding menu item.
void
CChildFrame::OnUpdateWindowFrontview(CCmdUI* pCmdUI)
{
CView* pView = GetActiveView();
if
(pView->IsKindOf(RUNTIME_CLASS(CFrontView)))
pCmdUI->Enable(FALSE);
}
13. Add a private member function called SwitchViews() to
the CChildFrame class. Implement this function. (See below.) Build and test.
If a
document template holds the document and view classes, then a document-view
context (CCreateContext) holds a view object and its associated document. The
SwitchView() function creates a document-view context, then sets the view as
the active view. The full details are a bit obscure.
void
CChildFrame::SwitchViews(CRuntimeClass *rtc)
{
static UINT id = 1; // an ID for the next new view
CView* pOldView = GetActiveView();
CView* pNewView = (CView*) rtc->CreateObject();
CCreateContext
context;
context.m_pCurrentDoc
= pOldView->GetDocument();
pNewView->Create(NULL,
NULL, NULL,
CFrameWnd::rectDefault,
this, id++, &context);
pNewView->OnInitialUpdate();
SetActiveView(pNewView);
pNewView->ShowWindow(SW_SHOW);
pOldView->ShowWindow(SW_HIDE);
pNewView->SetDlgCtrlID(AFX_IDW_PANE_FIRST);
RecalcLayout();
}
Version
1.2 Brick CAD with Static Splitter Views
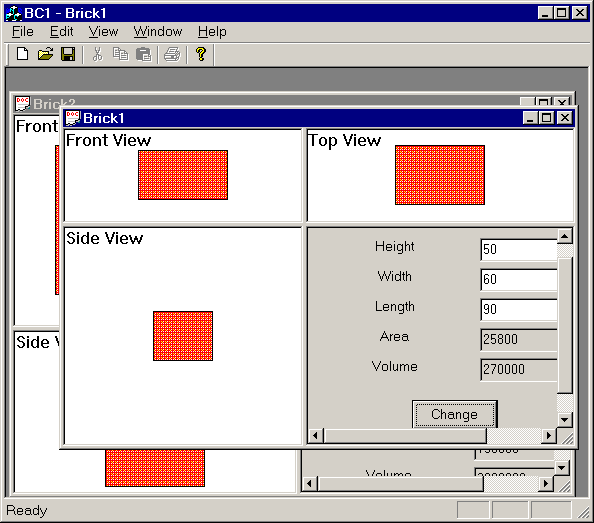
The final version of Brick CAD is a step backwards in usability from the previous version, but demonstrates how to create splitter windows. A splitter window allows us to display several views within the same child frame.
Implementation
If we were creating version 1.2 of Brick CAD from scratch, we could use the [Window Styles] tab of the [Advanced Options] dialog (which is accessed by clicking the [Advanced] button on the [Step 4 of 6] App Wizard dialog) to select "use split window". Instead, we simply add the necessary machinery to the child frame class.
14. Add a protected CSplitterView member variable to the
CChildFrame class. Use the Class Wizard to add an OnCreateClient() function to
the CChildFrame class. Implement the function so that it initializes the
splitter view member. (See below.)
Assume
we call our splitter window member variable m_wndSplitter:
CSplitterWnd
m_wndSplitter;
OnCreateClient()
calls the splitter window's CreateStatic() member function to set the number of
rows and columns to two. Next, the splitter window's CreateView() function is
called to specify the view in each quadrant of the frame:
BOOL
CChildFrame::OnCreateClient(
LPCREATESTRUCT lpcs, CCreateContext* pContext)
{
if (SPLIT)
{
m_wndSplitter.CreateStatic(this,
2, 2);
m_wndSplitter.CreateView(
0, 0,
RUNTIME_CLASS(CFrontView), CSize(100, 100), pContext);
m_wndSplitter.CreateView(
1, 0,
RUNTIME_CLASS(CSideView), CSize(100, 100), pContext);
m_wndSplitter.CreateView(
0, 1,
RUNTIME_CLASS(CTopView), CSize(100, 100), pContext);
m_wndSplitter.CreateView(
1, 1,
RUNTIME_CLASS(CPanelView), CSize(100, 100), pContext);
return TRUE;
}
else
return CMDIChildWnd::OnCreateClient(lpcs, pContext);
}
Dynamic
splitters are possible for applications in which all views are of the same
type.
Message Passing
Windows Applications without MFC
MFC Message Maps
Customized Message Passing
Problems
Problem 6.1
Finish and test version 1 of the Address Book Browser.
Problem 6.2
Finish and test version 2 of the Address Book Browser.
Problem 6.3
An inventory browser is a database browser that allows users to browse inventories. An inventory is a sequence of line items. A line item is a product record together with a quantity. For example: 2 egg beaters. A product record encapsulates the name, product id number, price, and description of a product. Using the address book browser as an example, build and test an inventory browser. Uses should be able to change line item quantities and add new line items.
Problem 6.4
Finish the Brick CAD application (version 1.1). Add a fifth type of view called an orthogonal view, which shows the height, width, and length of a brick: