Outline
- Latency Reduction Methods
- In-Class Exercise
Introduction
- On Monday, we gave the following list of techniques for reducing latency in VR headsets:
- Lower the complexity of the virtual world.
- Improve the rendering pipeline performance.
- Remove delays along the path from rendered image to switching pixels.
- Use prediction to estimate future viewpoints and world states.
- Shift or distort the rendered image to compensate for last-moment viewpoint errors and missing frames.
- We begin today by considering each of these in more detail.
Simplify the Virtual World
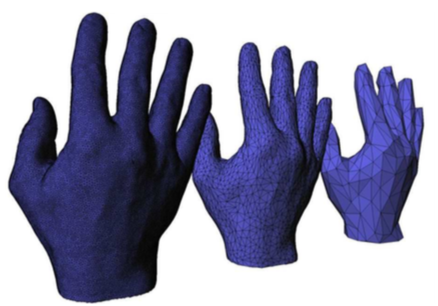
- A Virtual World consists of geometric primitives typically represented as triangle meshes.
- The chain of transformations to compute where things are in a scene and the rasterization process must be applied for each triangle in the scene and so has a cost proportional to the number of triangles.
- We would like to use highly accurate models for close-up objects.
- If a model is captured from the real world via something like a 3D scan or if it comes from modeling software like Blender where curved surfaces are being modeled, then it could be made up of millions of triangles.
- This level of detail is often unnecessary if the model is far away and each of these triangles is likely to be a pixel or tiny in size.
- To solve this problem a game engine like Unity, makes use of a vertex simplification algorithm.
- One side benefit of simplification is that it also often speeds up the update step of computing the effects of motion of objects in a scene.
Vertex Simplification Techniques
- Common algorithms for vertex simplification are based on:
- Vertex Clustering - we run a clustering algorithm (for example k-means) on the vertices to divide the vertices into `k` clusters where `k` is determined by how far we want to reduce the mesh size. We then pick a representative from each cluster based on a property like mean. We then recompute the mesh based on these representatives where we have an edge between representatives of two clusters if there was an edge in the original graph between members of the clusters.
- Decimation - Here we cycle over regions (collections of adjacent triangles up to a certain size). For each region, we evaluate its quality according to some mesh metric, then store all regions in a priority queue. Next, we repeat the following until we have a mesh of desire size: Pick the best mesh region, delete a vertex, re-triangulate, recompute the metric, and insert back into queue.
In-Class Exercise
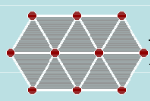
- Consider the figure above. Imagine we decimated this mesh by removed the leftmost center vertex.
- What would the resulting mesh look like?
- Upload a low-res screenshot to the May 8 In-Class Exercise Thread
Improving Rendering Performance
- In general, any technique that can speed up the process of drawing a scene will benefit a computer graphics or VR system.
- We have to be careful, though, that our speed-up technique is appropriate for VR.
- We have already mentioned, for example, that although texture mapping looks good and is fast in the CG setting, it often has a painted on look when the scene is rendered stereoscopically, as in a VR setting.
- On the other hand, the use of stencil buffers that we mentioned last day, which is a VR specific technique, often speeds up rendering performance.
- Another specific VR technique is to use a GPU to render both eye viewpoints in parallel, rather than serially as we did in our WebGL code.
From rendered image to switching pixels
- For historical reasons, most displays have a VBLANK time, the time between finishing drawing a frame line-by-line and the start time of drawing the next frame.
- A display may also have a short time delay between drawing a line left-to-right and drawing the next line left-to-right.
- Suppose a display runs at 100FPS. So a new image is made every 10ms.
- If VBLANK is 2ms, the time spent drawing the screen is 8ms.
- So if the rasterized image is drawn to the video memory during VBLANK, it will be drawn correctly in the remaining 8ms.
- However, if the image being drawn passes where the beam is scanning out the image to the display, a tearing such as above can appear.
- This can easily happen if the VWG renders the scene at a very high frame rate as compared to the display rate. For example 300fps rendering for a 100fps screen.
- Some fixes to this are to use a flag, VSYNC, which prevents the video memory from being written except during VBLANK or to use double or triple buffering.
- In the latter approach, we have multiple buffers of memory. in addition to video memory. The next frame that has completed drawing, but has not yet been shown, is copied to video memory during VBLANK. This approach can add to latency so doesn't work as well in the VR setting.
Using Prediction
- Suppose after using the techniques we have just described, we still have some latency.
- We might be able to reduce its effect by being able to predict answers to questions like:
- At what future time will the pixels be switching?
- What will be the positions and orientations of all virtual world models at that time?
- Where will the user be looking at that time?
- Let `t_s` be the answer to the first question.
- We want our VWG to produce a frame for time `t_s`, then perform visual rendering for the user's viewpoint at time `t_s`, so that when the pixels are switched at `t_s`, the stimulus presented to the user will be exactly correct. I.e., the user won't perceive any latency.
- To answer these three questions, the VWG must use a common clock for each of its operations and have enough speed as well as enough control from the OS to render frames at a consistent frame rate.
- For static scene, the answer to Question 2 is easy, for dynamic scenes, we must update the world geometry according to the physics of the world and `t_s`.
- The answer to Question 2 and definitely the answer to Question 3 rely on being able to predict what a human will do.
- Motions of the body are typically tracked by the VR system, and because of momentum and inertia (typically of the head), one can accurately predict where body parts will be on the timescale of 20ms.
Post-Rendering Image Warp

- Due to latency and imperfections in the prediction process, a last-moment adjustment might be needed before a frame is scanned out to the display.
- This is called post-rendering image warp and is also known as time warp or asynchronous reprojection.
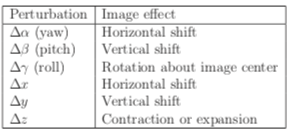
- Suppose the image has been rasterized according to the viewpoint `(x,y,z)` and yaw, pitch, roll orientation `(alpha, beta, gamma)`.
- What would be different about the image if it were rasterized for a nearby viewpoint?
- The table above shows six possible adjustments one might need.
- One way to compensate for these adjustments is to render frames slight larger than the display frame, then output to video memory only the portion needed to compensate for the adjustment needed.
- If we get to a situation like `(d)` above, it is often better to just repeat pixels then to draw black.
Flaws in the Warped Image
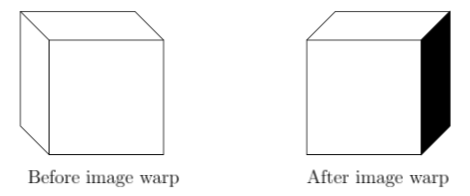
- Image warping can fix small orientation changes.
- On the other hand, position changes done via warping won't compensate for motion parallax, which would require knowing the depth of objects.
- With warping, One also gets visibility events, as shown above, where part of an object suddenly becomes viewable.
- One technique to fix these positional issues is to use an aspect graph or to use a visibility complex.
- Another technique is to not use image warping, but to actually compute several possible future frames and then use the one that was the closest to what actually happened.
Increasing Frame Rates
- Post-rendering image warp can also be used to artificially increase the frame rate.
- Suppose a slow computer only computes one image every 100ms. I.e, 10FPS.
- To increase this to 100FPS, a single rasterized image is warped to produce frames every 10ms until the next rasterized image is computed.
- This is called inbetweening or tweening.


