Outline
- More on iPhone Controls: TextFields
- Protocols
- Action sheets and Alerts
Active, Static, and Passive Controls
- On the iPhone UI controls come in three types: active (ex, button), static (ex, label), and passive (ex text field).
- All iPhone controls are a subclass of UIControl.
- Each control can trigger multiple actions depending on how they are touched. For example, a finger swipe might do something different than a tap.
- For some passive controls, like a text field we'll want to bring up the iPhone keyboard.
- The iPhone Keyboard is implemented as a view filled with a series of button controls.
- You never directly interact with the keyboard, but you instead write auxiliary code to control how it behaves.
An Image View and Text Field Example
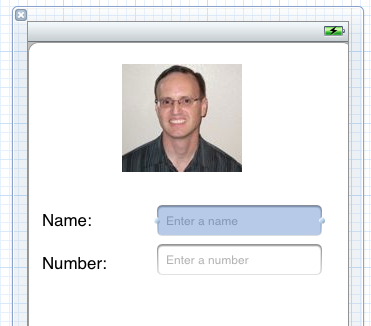
- We're going to build a simple app, with a view consisting of an Image at the top, then a pair of labels and textfields.
- First, to create the image we, as we did last day, create and add an image to our Supporting Files folder
- Then add an Image View to our View Panel in Interface Builder.
- Using the Inspector on the Image View Attributes, we select our image for the Image attribute.
- Next we add two Labels and two Text Fields to our view, these can be found in IB's Library under Inputs & Values
- For the Text Fields, we edit their Placeholder attribute to hint at what the user should
be entering in that text field.
- Make sure the Clear When Editing check box beneath this attribute is checked so the hint text vanishes when people start typing.
What it should look like
Text Input Traits
- Beneath the Font Attributes group of Text Field Attributes there is a collection of Text Input Traits.
- These control how/when the Text Field is selected, auto-capitalization, spell-checking, and how other things are done.
- One useful Text Input Trait is the Keyboard trait. We can select this to be Number Pad if we want the keyboard to default to be the numeric keypad.
- There is another Text Input Trait with which you can also select the text of the return key to be Done, if you like.
- Next we set up the Outlets for each of the Text Fields by switching to assistant view and Ctrl-dragging the TextField to the SecondPhone2012ViewController.h file.
- This is so we can send messages to the Text Fields objects when we do a click. If we do not set up these outlets, part of the code that follows won't work!
- If we did Build and Run at this point you would notice that once you had entered a Text Field the keyboard would come up but not go away.
Interface Code for Getting Keyboard To Go Away
//
//  SecondPhone2012ViewController.h
//  SecondPhone2012
//
//  Created by Chris Pollett on 2/15/12.
//  Copyright (c) 2012 San Jose State University. All rights reserved.
//

#import <UIKit/UIKit.h>

@interface SecondPhone2012ViewController : UIViewController
@property (retain, nonatomic) IBOutlet UITextField *nameField;
@property (retain, nonatomic) IBOutlet UITextField *numberField;
- (IBAction)textFieldDoneEditing: (id)sender;
// This is the action we want to handle to get rid of the keyboard
@end
Modified Controller Code for Getting Keyboard To Go Away
@synthesize nameField;
@synthesize numberField;

-(IBAction)textFieldDoneEditing:(id)sender
{
	[sender resignFirstResponder];
}
- This tells the Text Field to no longer behave as first responder for the UI
input.
- To hook this action with the Text Fields, we click on a given text field then
open the Connection Inspector. The Event we want to handle is Did End on Exit. So for textfield click and drag it to File's Owner and select the action textFieldDoneEditing.
Click Background To Close Keyboard
Sliders
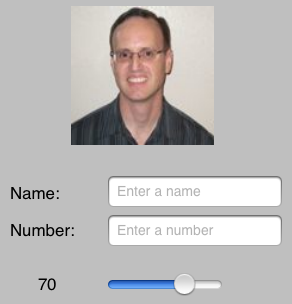
- Now let's look at how to use a simple slider to change the value of a label.
- We first in interface builder add to our view a slider and a label that will hold an integer value for the slider.
- Under the slider's attributes we set its min value to 0, its max value to 100, and its initial value to 50.
- Next we modify our label. We want the label to exactly wrap the size of the biggest value it will hold.
- To do this we set the text for the label to 100 and press apple-=. Then we set the label's value to 50.
- Finally, we create an outlet for the label, property and synthesize line, and hook it up, we create a new action with the following header signature and implementation
code:
//in the demo's ViewController.h
- (IBAction)sliderChanged:(id)sender;
// in the demo's ViewController.m
-(IBAction)sliderChanged:(id)sender
{
	UISlider *slider = (UISlider *)sender;
	int sliderPos = (int)(slider.value + 0.5f);
	NSString *text = [[NSString alloc] initWithFormat:@"%d", sliderPos];
	sliderLabel.text = text;
	[text release];
}
and then we hook it up in IB as well.
Slider Screenshot
Segmented Controls and Switches
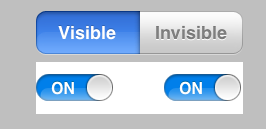
- For our next UI example we will look at how segmented controls can be used. We will use such a control to hide or display
a subview of additional controls.
- First, we drag over a segmented control. We change its title to Visible. This will after the label on the left segment. We
double click on the other segment to edit its values and change it to Invisible.
- Next we drag out another View and place it beneath the segmented control and put on this View two Switch's. Notice for segmented
controls that we can set the number of segments under attributes and there is a drop down to control which segment we are looking at.
- We are not going to make use of an outlet for the segmented control; however, we will have two outlets for the left and right switches.
Segmented Control and Switch Header
#import
#define kShowSegmentIndex 0

@interface SecondPhone2012ViewController : UIViewController

@property (retain, nonatomic) IBOutlet UITextField *nameField;
@property (retain, nonatomic) IBOutlet UITextField *numberField;
@property (retain, nonatomic) IBOutlet UILabel *sliderLabel;
@property (retain, nonatomic) IBOutlet UISwitch *rightSwitch;
@property (retain, nonatomic) IBOutlet UISwitch *leftSwitch;
@property (retain, nonatomic) IBOutlet UIView *switchView;

-(IBAction)textFieldDoneEditing: (id)sender;
-(IBAction)backgroundClick:(id)sender;
-(IBAction)sliderChanged:(id)sender;
-(IBAction)switchChanged:(id)sender;
-(IBAction)toggleShowHide:(id)sender;
@end
Segmented Control and Switch Implementation
@synthesize leftSwitch;
@synthesize rightSwitch;
@synthesize switchView;

-(IBAction)switchChanged:(id)sender
{
	UISwitch *whichSwitch = (UISwitch *)sender;
	BOOL setting = whichSwitch.isOn;
	[leftSwitch setOn:setting animated:YES];
	[rightSwitch setOn:setting animated:YES];
}

-(IBAction)toggleShowHide:(id)sender
{
	UISegmentedControl *segmentedControl = (UISegmentedControl *)sender;
	NSInteger segment = segmentedControl.selectedSegmentIndex;

	if(segment == kShowSegmentIndex) [switchView setHidden:NO];
	else [switchView setHidden:YES];

}
After writing this code we need to set up each of the outlets and actions in Interface Builder.
Switch Segmented Control Screenshot
Action Sheets and Alerts
- We are now going to discuss adding a button and making an action sheet
appear after clicking it.
- Action sheets are modal dialogs -- when an action screen is shown, the user cannot interact with any other part of the application.
- To implement an action sheet we need to say our class conforms to the protocol.
UIActionSheetDelegate.
- Protocols are a little bit like Java interfaces. To review what we said before, they can be defined in a header file using the syntax:
@protocol MyDelegate
// list optional methods
-(void) optionalMethod1;
// ...
@required
//list required methods to implement protocol
-(void) requiredMethod1:(id)myThing;
//...
@end;
- A class that uses this protocol says so with a declaration like:
@interface MyClass : NSObject <MyDelegate>
//...
@end;
How we modify our Controller's Header
#import
#define kShowSegmentIndex 0

@interface SecondPhone2012ViewController : UIViewController
<UIActionSheetDelegate>

@property (retain, nonatomic) IBOutlet UITextField *nameField;
@property (retain, nonatomic) IBOutlet UITextField *numberField;
@property (retain, nonatomic) IBOutlet UILabel *sliderLabel;
@property (retain, nonatomic) IBOutlet UISwitch *rightSwitch;
@property (retain, nonatomic) IBOutlet UISwitch *leftSwitch;
@property (retain, nonatomic) IBOutlet UIView *switchView;
@property (retain, nonatomic) IBOutlet UIButton *doStuffButton;

-(IBAction)textFieldDoneEditing: (id)sender;
-(IBAction)backgroundClick:(id)sender;
-(IBAction)sliderChanged:(id)sender;
-(IBAction)switchChanged:(id)sender;
-(IBAction)toggleShowHide:(id)sender;
-(IBAction)doStuff:(id)sender;
@end
Code for doStuff
-(IBAction)doStuff:(id)sender
{
	UIActionSheet *actionSheet = [[UIActionSheet alloc]
		initWithTitle:@"Are you sure?"
		delegate:self
		cancelButtonTitle:@"No Way!"
		destructiveButtonTitle:@"Yes, I'm Sure!"
		otherButtonTitles:nil];
	[actionSheet showInView:self.view];
	[actionSheet release];
}
Code for Protocol Method
-(IBAction)actionSheet:(UIActionSheet *)actionSheet
didDismissWithButtonIndex:(NSInteger)buttonIndex
{
	if(!(buttonIndex == [actionSheet cancelButtonIndex]))
	{
		NSString *msg = nil;
		if(nameField.text.length > 0)
		{
			msg = [[NSString alloc] initWithFormat:
			 @"You can breathe easy, %@, everything went okay."
			, nameField.text ];
		}
		else
		{
			msg = @"You can breathe easy, everything went okay.";
		}

		UIAlertView *alert = [[UIAlertView alloc]
			initWithTitle:@"Something was done"
			message:msg
			delegate:self
			cancelButtonTitle:@"Phew!"
			otherButtonTitles:nil];
		[alert show];
		[alert release];
		[msg release];
	}
}
To Complete the Project
- In IB we then add a new button with Do Something on it.
- We then connect its Touch Up Inside event to our doStuff method


