Outline
- Simulators versus Emulators
- XCode
- Interface Builder
- Adding an Icon to an App
- Compiling and running an App in the Simulator
- Creating an Android Project in Eclipse
Simulators versus Emulators
- As we go through the semester I will periodically try to fix the
terminology I use for things.
- One pair of words which we will use a lot and that are often confused is simulator and emulator.
- A simulator typically creates an environment via shared libraries that is like the environment
of the mobile phone but which is running the machine code of the desktop.
- An emulator is a program which actual reads the machine code for the target device and executes
it in an environment on the desktop that looks like the device.
- For iPhone development we use a simulator; for Android we use an emulator.
Creating a Project
- At this point I assume you have downloaded XCode from the Mac App Store.
- This actually gets you an Install XCode.app as well. You use this in the future any time
you want to update XCode.
- Launch XCode, select Create a New Project.
- To create a simple new project, go to File > New Project.
- Select Single-View Application and give it a name.
XCode Project Window
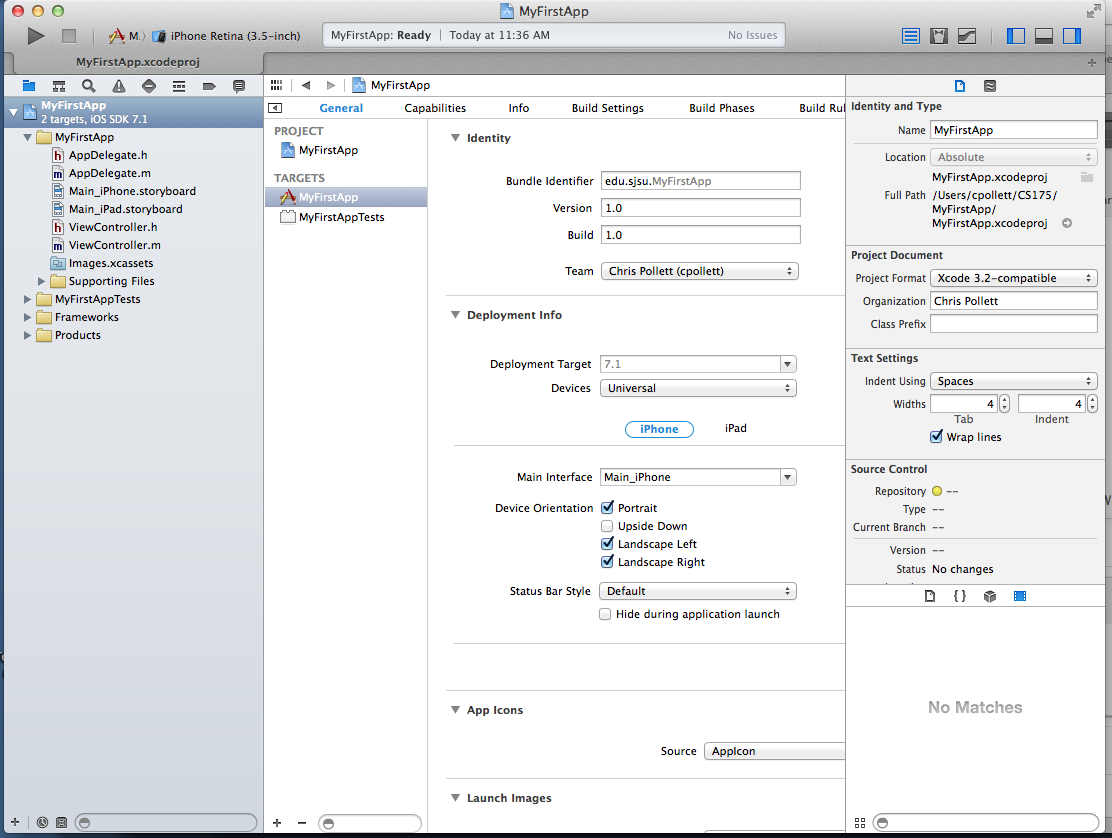
More on Each Part of IDE Window
- Toolbar -- the top part of the workspace window.
- Left hand side has tools for starting, stopping project, and a pop-up to select a scheme for target and build setting.
- Next to this is the activity view which displays any actions of processes that are currently happening.
- Next in the toolbar there is a group of three different editor configurations: standard view -- which generally has a single pane used to edit a file, assistant view which splits the editor pane into a left and right (one might show source the other the header file), and versions view that has time machine features
- The Organizer button has different nonproject-specific functionality such as viewing the API documentation.
- Navigator View -- the left hand pane of the project, can be used to display the files in the project (project navigator), the symbols in the project (symbol navigator), searches on the files (search navigator), issues related to the build (issues navigator), debug information (debug navigator), breakpoints (breakpoint navigator), and log messages (log navigator).
- Editor -- If you select a single file in the project navigator, and you are in standard view, and XCode knows how to display the file, then it appears in the editor pane in the center of the XCode Window. Right above this is the Jump Bar that allows you to go forward and back through files as well as to see and click on parts of the path to the current file.
XCode 4 and Newer versus Earlier Xcodes
- Prior to Xcode 4, (the current version of Xcode in 5.x) there was a separate program for editing user interfaces called Interface Builder. This is now built into the workspace itself as we will see.
- Before Xcode 4, code for iOS was compiled using gcc, starting with Xcode 4 a new compiler called LLVM
is used.
- This is an open-source compiler project originally started at the Urbana-Champaign 2000 and uses a BSD-license. Like GCC it can target different languages one of which is Objective-C.
- Supposedly, LLVM produces faster code that gcc and can generate better error messages and warnings.
- Apple also might like LLVM's licensing better than GNU licensing and the LLVM code-base is supposedly less crufty.
A Simple Project
- A bunch of resources will be automatically created for you in the Navigator Pane when you create a new project:
- Name-of-Project Folder -- The first folder in your project is always named after the project. This is where the code that you write will go (Objective-C). You can do what you like in here -- add files and sub-folders. You should notice in this folder there are two files: MainStoryboard_iPhone.storyboard, and
MainStoryboard_iPad.storyboard. These specify the interface of the project -- when you create a single-view application it gives a checkbox to allow you to select whether you
want to use storyboards or the old style XIB files.
- Images.xcassets -- has the apps icons
- Supporting Files -- This folder is created for you within the Name-of-Project folder. For now we won't need to change much here. When we create a project as above it will contain
a .pch file (pre-compiled header) for your project and a main.m file, a properties list and a strings file for localization.
- Name-of-ProjectTests Folder -- This contains test cases you write while writing your code.
- Frameworks -- libraries which may contain code as well as resources that could be used by our project. Most of the standard frameworks are included in our project by default, so for we don't have to add anything here.
- Products -- contains the application that this project produces when it is compiled.
Interface Builder
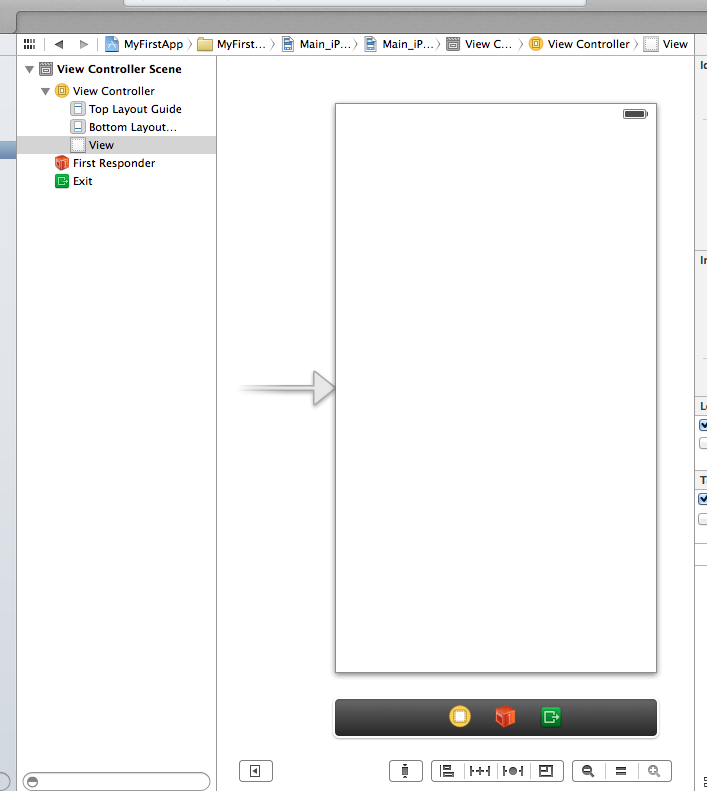
- To see the integrated Interface Builder of xCode 5 we can click on the MainStoryboard_iPhone.storyboard file.
- Adjusting the different panes a bit might yield something that looks like:
More on Interface Builder
- You can develop interfaces for the iPhone either directly in code, or using the Interface Builder.
- For example, in code, you can generate a button by having a line like:
UIButton *myButton = [[UIButton alloc] initWithFrame:aRect1]
- If you go to View - Utilities - Object Library, then in the lower right pane of XCode and you get a palette of things you can drag onto your view.
- For example, you could select a button, and drag it to where one wants on the View. Clicking on the button you could then add text to it.
- Interface builder has been around since the late 80s. Originally, the files edited by Interface Builder were called .nib files. Now Interface Builder supports .nib and .xib (XML-based) files; however, often people call both kinds of files "NIB" files.
- The leftmost pane is the nib files main window. Here's what will have been created for us in this Window:
- File's Owner -- the object that "owns" this copy of the NIB file. We'll say more about this later.
- FirstResponder -- again a fuzzy concept for now -- the object with which the user is currently interacting.
- Everything else in this window -- objects that will be created when the NIB file is created. In our case, we get an Icon View. This object is really a subclass of UIView. Clicking on this line will open up
what we have put on the View.
Setting Attributes of a UI Component
- To make labels, buttons, etc more interesting, we often want to style them. i.e., we want to set a bunch of the attributes that are used when drawing them.
- To do this we can go to View - Utilities - Show Attribute Inspector.
- This will show a panel in the upper right pane of Xcode that will let us set these attributes.
Compiling Our Program
- To compile our program we simply click on the Run icon in Xcode.
- This will launch the iPhone simulator with our program running.
- Command-Shift-H can be used as the home button in the simulator.
Changing the Application Icon
- The icon used in iPhone Home Screen for your project is by default a white square with a some circles and lines on it:

- To change this, click on the Images.xcassets folder in the Project Navigator. In the center column you will see displayed:
AppIcon and LaunchIcon.
- Clicking on AppIcon will lead to a screen that displays the current AppIcon image set:

- You can drag images (must be PNG) onto the various squares and they will be used as the corresponding item in the app.
- If your image is of the wrong size XCode will give you a warning and tell you what the correct size for that particular item is. The three main sizes are 58 x 58 px, 76x 76px, 114 x 114px and 120 x 120 px, depending on the flavor of the OS, whether we are targeting an iPhone or iPad, and whether the display was retina or not.
Creating an Android Program
- Assuming you have downloaded the SDK and installed the Eclipse Plug-in.
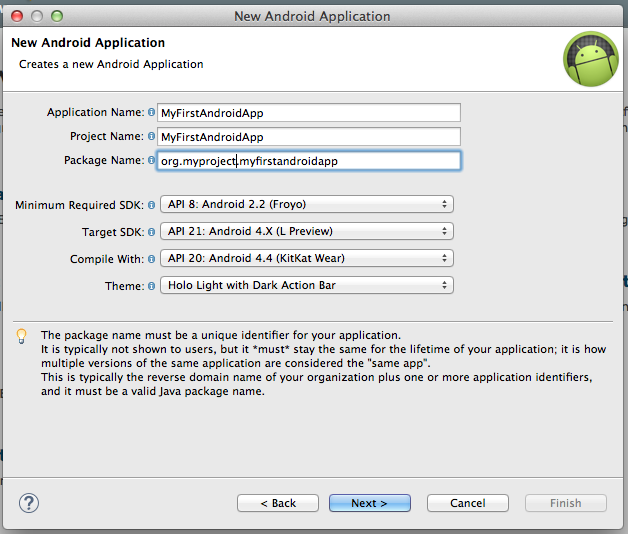
- Go to File > New > Project> Android Application Project
- Fill-in a project name: Hello
- You can leave the SDK drop downs for now at their default settings.
- Give an application name like: Hello World.
- Give a package name like: org.myproject.Hello
- As you click next going through the project set up you will be able to select icons for your App.


