Appendix 2: Visual C++
User Interface Concepts and Terminology
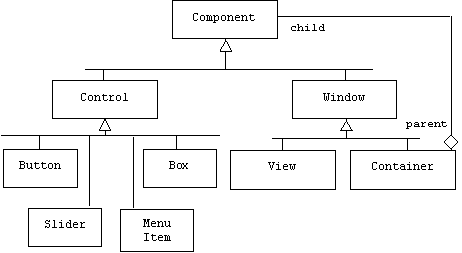
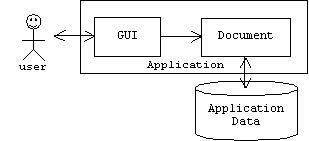
Like a bicycle, skyscraper, or sewing machine, a graphical user interface (GUI) is an assembly of components. Broadly speaking, there are two varieties of GUI components: windows and controls. Buttons, boxes, sliders, icons, and menu items are examples of controls. Controls are primarily input devices; they allow users to specify which operations should be performed on an application's data. Windows can be output devices that display views of an application's data, such as charts, graphs, worksheets, or text. Windows can also be component containers such as menu bars, toolbars, and dialog boxes. A container window might contain buttons, boxes, and menu items. A container might even contain other windows. We can summarize these concepts with a class diagram:
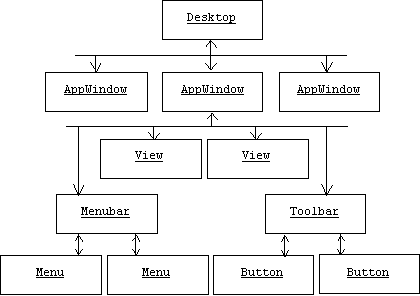
Like other types of assemblies, we can think of a GUI as a tree-like structure. Each node in the tree is a GUI component. Parent nodes are container windows and leaf nodes are controls or views. The root of a GUI tree is an application window, the main window of an application, which may contain a menu bar, several toolbars, views, and dialog boxes. Of course application windows can be regarded as children of the system's desktop. For example, here's an object diagram that shows three application windows that are currently open on a desktop. One application window currently contains a menu bar, a toolbar, and two views. Note the tree-like structure:
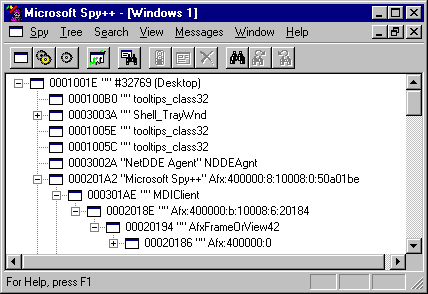
We can actually see the window tree using a Visual Studio tool called Spy++:
Notation
In this book we employ the notational convention of placing names of components inside square brackets. For example, most application windows have a menu bar containing a [File] menu. Usually this menu contains an [Open...] menu item. Selecting this item displays an [Open] dialog box containing a [File name:] edit box, [Open] and [Cancel] buttons, and a [Look in ...] list box. Following the style of UNIX path names, we denote paths in a GUI tree as sequences of components separated by slashes:
[Container]/[Container]/.../[Component]
For example, we might instruct the reader to:
Type "main.cpp"' in the [File name:] edit box of the [File]/[Open...]/[Open] dialog, then click the [Open] button.
Or we might tell the reader that in order to start the Spy++ program mentioned:
Select [Start]/[Programs]/[Microsoft Visual Studio]/[Microsoft Visual Studio Tools]/[Spy++].
This notation system isn't perfect, but most ambiguities should be easily resolved by the context. Naturally, these limitations won't prevent us from extending our notation to describe non-GUI components such as keyboard keys. For example:
To display the [Windows NT security] dialog, press the [Delete] key while holding down the [Ctrl] and [Alt] keys.
Actions
Sometimes it is useful to have a uniform terminology for the typical actions a user must perform. We may distinguish low-level actions such as "click the left mouse button" from high-level actions such as "click the [Open] button." We may also distinguish simple actions such as "select the [File] menu" from compound actions such as "open the file called main.cpp". Some common actions and their typical meanings include:
Point
: Move the mouse cursor over a component.Click: Point at a component, then press the left mouse button.
Press: Click a button or press a keyboard key.
Double click: Point at a component, then quickly press the left mouse button twice.
Right click: Point at a component, then press the right mouse button.
Select: Highlight a component by clicking on it. Multiple components can be selected by holding down the [Shift] key while clicking on each component.
Select a menu or menu item: Selecting a menu causes a list of menu items to be displayed. Pointing at each item causes the item to be highlighted. Selecting a menu item means clicking a highlighted menu item.
Drag: Select a component, but don't release the left mouse button. Instead, hold the left mouse button down while moving the mouse across its pad. In most cases this will have the effect of moving the component. When the component is in the desired location, release the left mouse button.
Enter: Selecting a text box gives it keyboard focus. This means all text subsequently typed will appear in the text box. In most cases pressing the [Tab] key can be used to change the keyboard focus from one component to the next. (It's important to remember that the mouse cursor is not the same as the keyboard cursor, which is sometimes called the insertion point.)
Type: Same as enter.
Copy: Select a component, then either select [Copy] from the [Edit] menu, or pressing the [C] key while holding down the [Ctrl] key. This action copies the component into a system-wide memory buffer called the clipboard. Note: the clipboard can only hold one object at a time, so copying a component onto the clipboard automatically overwrites the previous contents.
Cut: Select a component, then either select [Cut] from the [Edit] menu, press the [X] key while holding down the [Ctrl] key, or press the [Delete] key. The first two methods copy the cut component into the clipboard.
Paste: To copy the contents of the clipboard into a selected window, select [Paste] from the [Edit] menu or press the [V] key while holding down the [Ctrl] key.
Undo: To undo the last command, select [Undo] from the [Edit] menu, or press the [Z] key while holding down the [Ctrl] key.
Redo: To redo the last undone command, select [Repeat] from the [Edit] menu, or press the [Y] key while holding down the [Ctrl] key.
Shortcut Menus and Property Sheets
Nearly every Windows component has an associated shortcut menu that displays the most common operations that can be performed on the component. The shortcut menu can be displayed by right clicking on the component. The last item on most shortcut menus is [Properties]. Selecting this item displays a tabbed dialog box called the component's property sheet. The property sheet consists of one or more property pages that can be displayed by selecting the tabs near the top of the dialog. A property page can be used to inspect and alter a component's properties.
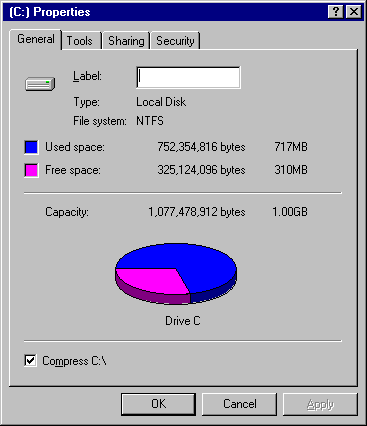
For example, right clicking on the [Desktop]/[My Computer]/[C:] icon displays a shortcut menu containing the most common operations that can be performed on a hard disk: [Open], [Explore], [Find...], [Sharing...], [Format...], [Create Shortcut], and [Properties]. Selecting [Properties] displays a property sheet containing four property pages: [General], [Tools], [Sharing], and [Security]:
Hotkeys
Most menu items have corresponding toolbar buttons and hot keys that issue the same commands. (Some users don't like to take their hands off the keyboard because it slows them down.) The hot key for a menu or menu item is the underlined letter in its name. For example, to open the [File] menu, the user can select it, press the [Open File] button on the [Standard] toolbar, or press the [F] key while holding down the [Alt] key. The user may now use the [up] and [down] arrow keys to highlight the [Open] menu item, then press the [O] key to open a file.
The Visual C++ User Interface
Let's begin by learning how to start Visual C++:
1. Start Visual C++ by clicking the desktop's [Start] button, then selecting [Microsoft Visual C++] from the [Programs]/[Microsoft Visual Studio] menu. This should open the Visual C++ application window.
The Visual C++ application window can be confusing, so it's important to know how to simplify and customize it. Begin by using the menu bar's shortcut menu to hide all of the toolbars and views:
2. Right click in an empty region of the menu bar. This should display a list of all windows and toolbars. Uncheck each checked item. Except for the title, menu, and status bars, the application window should now be empty. The large empty area in the middle of the window is called the work area.
Like most windows, the Visual C++ application window is always in one of four states: closed, minimized, maximized, or resizable. Three tiny buttons in the upper right corner of the window allow the user to switch the window from its current state to one of the other three states. Closing the application window (click the [X] button or select the [File]/[Exit] menu item) terminates Visual C++. In its maximized state, the application window completely fills the desktop. In its minimized state the window is reduced to an icon on the taskbar. In its resizable state the window can be resized by dragging its bottom right corner, or it can be moved around the desktop by dragging its title bar.
Next, create some editor windows inside the application window:
3. Select the [File]/[New...] menu item. This should display the tabbed [New] dialog box. Select the [Files] tab. Select [Text File] item from the list box, then press the [OK] button. (Or more succinctly: select [File]/[New...]/[New]/[Files]/[Text File], then press the [OK] button.)
A text editor document window should appear inside the work area of the Visual C++ application window. Document windows are examples of views, because they display the text contained in a document. Of course we can also use a document window to insert or delete text from a document. Try typing a few lines of text in the new window.
Notice that like its parent, a document window is always in one of four states. Buttons in the upper right corner of the document window allow us to change its state. Be careful: in its maximized state these buttons are no longer in its upper right corner. Instead, they jump up to the application window's menu bar, where they are perilously close to the application window's state buttons. In its minimized state, an application window is reduced to an icon in the application window. Spend some time experimenting with moving and resizing the document window. Notice that it cannot be moved outside of its parent window's work area. We say that a document window is clipped by its parent window.
Repeat step 3 several more times so there are many document windows. When the work area gets crowded, we can use the [Window] menu to cascade, tile, close, duplicate, and expose document windows. Spend some time experimenting with this menu, then close all of the open document windows.
In addition to document windows, Visual C++ has two permanent windows- [Workspace] and [Output] -and about a dozen toolbars. All of these are examples of docking windows.
4. Expose the [Workspace] window by selecting the [Workspace] item from the menu bar's shortcut menu.
Docking menus are skittish creatures. They like to cling (i.e., dock) to the inner edges of their parent windows. Sometimes it's difficult to coax one away from the edge and into the center of the work area. Try dragging the [Workspace] window away from the edge of the main window. It takes some practice and luck. Curiously, once it gets out of its clinging state, a docking window can be fiercely independent. For example, docking windows generally aren't clipped by their parents. Try dragging the [Workspace] window over the main window of another application!
Visual C++ has more toolbars than anyone needs. Use the menu bar's shortcut menu to expose all of the toolbars and windows. Like the [Workspace] window, the toolbars are docking windows that can be repositioned by the user, but notice that with all of the toolbars exposed, the work area is reduced to a miniscule patch of screen space. Since most of the toolbar buttons duplicate menu commands, programmers can leave the toolbars hidden. Usually, the [Output] window can also remain hidden.
Workspaces, Projects, and Files
Through an application's user interface, users create, open, view, edit, and save application documents:
Microsoft Excel, Word, and Power Point all create and edit distinctive types of documents. But what sorts of documents are created by Visual C++? Actually, Visual C++ allows users to create and edit many types of documents: workspaces, projects, files, and resources. A workspace is a project container, and a project is a file, configuration, and resource container:
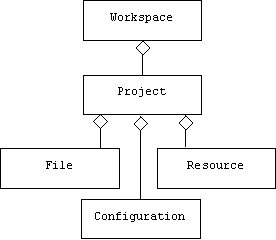
Application menus, dialogs, and toolbars are examples of resources. Source files, header files, and resource scripts are typical project files. A configuration is a collection of compiler, linker, and debugger settings.
For example, let's create a workspace called "Planets". Start Visual C++, then:
1. Display the [New]/[Workspaces] dialog by selecting the [File]/[New...] menu item. Enter an appropriate parent directory for the workspace in the [Location:] edit box. Type "Planets" in the [Workspace name:] edit box, then click the [OK] button.
Next, create a project called "Neptune" in the Planets workspace:
2. Display the [New]/[Projects] dialog by selecting the [File]/[New...] menu item. Click the [Add to current workspace] button. Type "Neptune" in the [Project name:] edit box. Select [Win32 Console Application] from the list box, then click the [OK] button. A dialog box called [Win32 Console Application- Step 1 of 1] appears. Click the [A "Hello World" Application] button, then click the [Finish] button. A [New Project Information] dialog appears describing the project that will be created. Click the [OK] button.
Repeat this step twice more to create projects called "Uranus" and "Pluto" in the Planets workspace.
Open the [Workspace] window if it's not already open. Notice that it has two tabs: [File View] and [Class View]. Both are tree controls that display the projects contained in the Planets workspaces. The [Workspace]/[File View] tree control displays the header, resource, and source files contained in each project, while [Workspace]/[Class View] tree control displays the classes, functions, and variables contained in each project.
The [+] button next to a parent node of a tree control can be used to show its children. The [-] button can be used to hide its children. Double clicking on a leaf node automatically opens the corresponding file. Select [Workspace]/[File View] tree control. Experiment with closing and opening all of the parent nodes. Notice that one of the project nodes, probably [Pluto] is in boldface. This is the current project. Users can change the current project using the [Project]/[Set Active Project] menu.
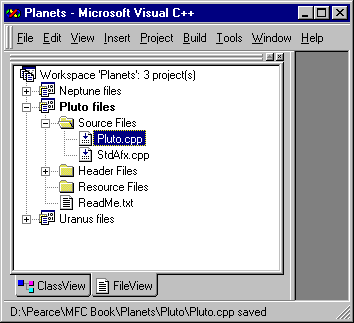
Double clicking on a node opens a document window containing the corresponding file. Use this technique to open the file Pluto.cpp. Replace the string "Hello World!" by "Hello Pluto!", then build Pluto the project:
3. Select [Build]/[Build Pluto.exe] or press the [F7] key to build (i.e., compile and link) the project. The [Output] window suddenly appears and displays compiler and linker messages.
If all goes well, the message "Pluto.exe - 0 error(s), 0 warning(s)" should appear in this window. Now it's time to test the project:
4. Select [Build]/[Execute Pluto.exe].
A console window should appear displaying the "Hello Pluto!" message:
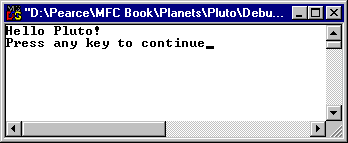
Press any key to return to Visual C++. Repeat the exercise for the Uranus and Neptune projects. Test the Neptune program by changing the current directory of a console window to the directory containing the executable file, and typing "Neptune.exe":
C:\Planets\Neptune\Debug>Neptune.exe
Hello Neptune!
(Select [Start]/[Programs]/[Command Prompt] to open a console window.)
Removing and Adding Files from a Project
To remove a file from a project, select the file's icon in the [File View] tree control, then press the [Delete] key. The same technique can also be used to remove projects from a workspace.
To add a file that already exists to a project, select [Files] from the [Add to Project] submenu of the [Project] menu. (If your workspace contains multiple projects, make sure the right project is selected.) Note: the file doesn't need to be in any particular directory.
Configurations
Besides files, a project also includes configurations. There are two default configurations: Release and Debug. The [Set Active Configuration] command on the [Build] menu allows programmers to select a setting. The [Configurations] command on the Build menu allows programmers to add and remove configurations to their project.
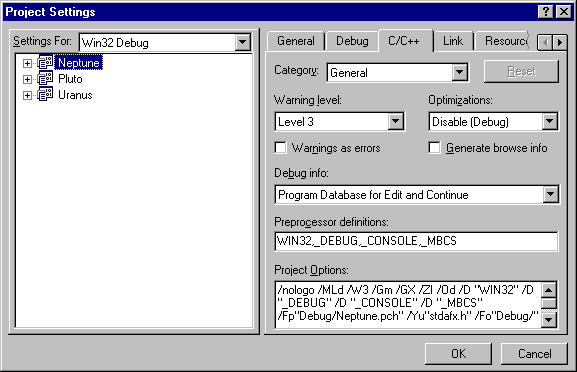
A configuration is a collection of compiler, linker, debugger, and other settings. A project's configurations can be inspected and altered by selecting [Project]/[Settings] to display the tabbed [Project Settings] dialog. Select a project from the dialog's [Settings for:] drop down list:
Getting Help
Even the most experienced programmer, no wait, make that "especially the most experienced programmer," spends most of his programming hours searching through on-line help documents. No one remembers every single parameter of every single library function, and the experienced programmer is willing to spend an hour looking for a library function rather than spend ten minutes creating a new function that may be less reliable.
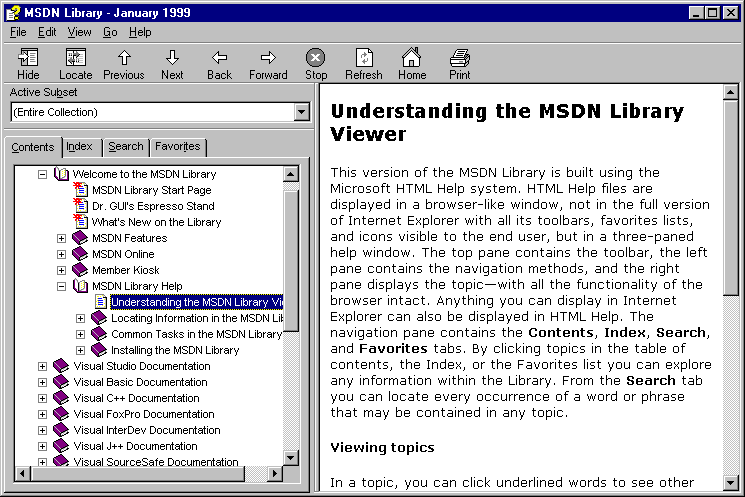
Starting with Visual C++ version 6.0, on-line help is accessed through a separate program called the Microsoft Developer Network (MSDN) Library Viewer, which is nothing more than a half-baked web browser together with over a gigabyte of compiled HTML documents.
The MSDN viewer's application window is divided into three panes: [Tool Bar], [Navigator], and [Display]. MSDN documents (or ordinary web pages) are displayed in the [Display] pane. The [Navigator] pane is a tabbed window that allows users to choose between four search methods: [Contents], [Index], [Search], and [Favorites] (which is nothing more than bookmarks to the user's "favorite" documents). The [Tool Bar] provides the usual web browser controls: [Back] and [Forward] arrows for revisiting documents; [Previous] and [Next] arrows for sequentially accessing documents; a useful [Locate] button that shows the position of the displayed document in the table of contents; a [Hide] button that hides the navigation pane; and of course the familiar [Home], [Refresh], [Stop], and [Print] buttons:
The MSDN viewer even contains documents about itself, which are located in the volume: Welcome to the MSDN Library/MSDN Library Help
The Table of Contents
The MSDN library is divided into many volumes. Each volume may contain documents and sub volumes. Thus, the library is a tree-like structure: parent nodes are volumes and leaf nodes are documents:
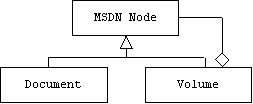
The [Contents] tab of the [Navigation] pane makes this tree-like structure explicit with a tree control that displays each volume as a book icon next to an open[+]/close[-] button. Documents are displayed as document icons. Double clicking a document icon displays the document in the [Display] pane.
Although there are many volumes in the MSDN library, we will mostly be interested in the Visual C++ Documentation and Platform SDK volumes. For our purposes the most useful sub volumes will be:
MSDN Library/
Visual C++ Documentation/
Using Visual C++/
Visual C++ Programmer's Guide
Visual C++ User's Guide
Glossary
Reference/
C/C++ Language and C++ Libraries
Microsoft Foundation Class Library and Templates/
Microsoft Foundation Class Library
Platform SDK/
Win32 API
The Visual C++ Programmer's Guide
The Visual C++ Programmer's Guide contains technical information about developing programs, such as compiling and linking, debugging, preprocessing, the runtime library (which includes the standard C library), and a useful "quick reference" that can be used to look up brief documents about C/C++ operators and syntax:
Visual C++ Programmer's Guide/
Compiling and Linking
Debugging
Preprocessor Reference
Quick Language Quick Reference
Runtime Library Reference
The Visual C++ User's Guide
The Visual C++ User's Guide contains information about the Visual C++ environment, such as how to use the debugger, how to use the editor, working with projects, and the Visual C++ user interface:
Visual C++ Users Guide/
The Visual C++ Environment
Working with Projects
Text Editor
Debugger
The C++ Language and Library References
The Reference volume is probably the most useful volume in the library. Not only does it document all of the features of C and C++ (readers may find some of these documents more useful than their text books), it also documents the standard C++ library- which consists of the stream library and the template library (STL) -together with the pre-standard stream library. (The standard C library is documented in the Runtime Library Reference in the Programmer's Guide):
Reference/
C/C++ Language and C++ Library/
C++ Language Reference
C Language Reference
iostream Library Reference
Standard C++ Library Reference
The title pages of the Programmer's Guide, User's Guide, and C/C++ Language and Library make excellent bookmarks. We can also restrict the table of contents (as well as the index and word search) to the Visual C++ Documentation volume by selecting that volume in the "Active Subset" text box above the Navigation window.
The Microsoft Foundation Class Library
The Reference Volume also contains the Microsoft Foundation Class Library sub-volume, which is divided into two volumes: Technical Notes and Class Library:
Reference/
Microsoft Foundation Class Library and Templates/
Microsoft Foundation Class Library/
Class Library
Technical Notes
Technical Notes contains numbered reports on bugs and otherwise undocumented "features". The Class Library contains a volume on every MFC class. The Hierarchy Chart and Class Library Overview sub-volumes should be book marked.
The Win32 API
The Win32 API sub-volume of the Platform SDK volume documents the C programmer interface to all Windows platforms. It is important for MFC programmers to have some familiarity with the Win32 API, because MFC classes are really only a C++ layer built on top of the Win32 API.
The Index
The [Index] tab of the [Navigator] pane displays the library's index in a list box. User's can scroll through the list box, but it's faster to type the word you're looking for into the [find keyword] text box above the list box. If the word is located in the index, it is automatically selected in the list box. Clicking the [Display] button will automatically display the corresponding document, or if there are several relevant documents, a dialog box appears displaying the choices.
For example, suppose we forget the peculiar syntax of the C/C++ switch statement. Typing "switch" into the [find] box locates "switch" in the list box. Clicking the [Display] button displays a dialog box containing a choice of several documents: do we want to read about the Java switch statement, the C switch statement, or the C++ switch statement? We select the C++ switch statement, and a document titled The C++ Switch Statement is displayed in the [Display] pane.
As another example, suppose we forget how to use the string compare function, strcmp(). We type strcmp into the [find] box. strcmp is located in the list box, we press the [Display] button, and a document titled strcmp, wcscmp, _mbscmp is displayed.
Searching for Text
The Table of Contents and the Index are useful for people who already have a pretty good idea of what they are looking for. For those times when we are groping in the dark, there is text search.
For example, suppose we are looking for information about type conversion. Click the [Search] tab on the [Navigation] pane, enter "type conversion" into the [type in the words to search for] text box, make sure the Visual C++ Documentation volume is selected in the [Active Subset] text box (otherwise the entire library is searched), and press the [Search] button. After a while, 66 documents containing the phrase "type conversion" are listed in the list box. We can now scroll through the list box looking for a document that sounds useful.
Like all search engines, we need to be careful about limiting our search. For example, typing the phrase "type conversion" without the quotes locates 292 documents containing the word "type" or the word "phrase". Typing the phrase "type AND conversion" lists all documents containing both words, but not necessarily together.
Accessing the MSDN Viewer from Visual C++
There are two ways to control the MSDN viewer from within Visual C++. First, the Visual C++ [Help] menu options: [Contents], [Index], and [Search] allow programmers to select the corresponding tab in the viewer's [Navigator] pane. This is useful if the viewer isn't running, because selecting the option starts the viewer in a window that opens over the Visual C++ window. If the viewer is already running, the menu is nearly useless because selecting the option selects the corresponding tab, but the viewer window remains under the Visual C++ window.
A more popular way to get help on a name is to select it with the mouse, then press the [F1] key. The viewer automatically locates all documents listed under the selected name in the index.
Context Sensitive Help
The new Visual C++ editor maintains a record of every variable, function, and type declaration in the current project and in the system libraries. When the user is editing a header or source file, the editor uses this data, together with the position of the insertion point or mouse cursor, to create and display useful tool tips. There are three types of help available:
Type Info
: Placing the mouse cursor over a name displays the type of the name.Parameter Info: Typing a call to a global function displays the function's parameter list.
List Members (plus comments) and Complete: Typing a definition or call to a member function displays a list of all member functions for that class. (How does the editor know which member functions to display?) The user can either select a function with the mouse, or continue typing and let the editor figure out which member function is being called. When the editor selects the correct function in the list, the user only needs to press the Enter key, and the editor automatically completes the rest. As an added bonus, when a name is selected in the list, any comments associated with the name are also displayed.
Type, parameter, and member information can also be obtained by selecting the appropriate option from the [Edit] menu.
The Edit-Build-Test-Debug Cycle
Program development is a cyclic process: edit, build, test, debug, edit, build, test, debug, etc.:
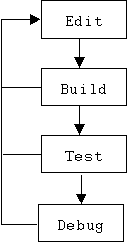
During the edit phase the editor is used to create and modify source code. In the build phase the program is compiled and linked. Errors that pop up during the build phase force programmers back to the edit phase to make corrections. After a successful build phase, program testing begins. Programmers attempt to exercise each path through their program. Sometimes the nature of an error that occurs during the test phase is obvious, and programmers can go directly back to the edit phase to make the necessary corrections. More commonly, test phase errors are subtle and require the use of a debugger to trace the errant path of execution while monitoring the values of suspicious expressions.
A Suggestion
Only make a small number of modifications during the edit phase. This will increase the number of loops you make through the edit-build-test-debug cycle, but the complexity and duration of each phase will be much more manageable. There's nothing quite so discouraging as a list of 500 compiler errors. Even after you correct them, there is still the prospect of scores of errors that will turn up during testing.
Building
Compiler Errors
Compiler errors include syntax and type errors that occur in a single source code file. These errors are reported in the output window when we build our program. If we double click on an error message, Visual C++ will show us the offending line of code. Select the compiler error code (Cxxx), then press the [F1] key. This displays an MSDN document explaining the general nature of the error.
Always begin with the first error message, because the same bug may cause several errors. For this reason it is sometimes a good idea to rebuild your program after fixing a syntax error just to see how many error messages disappear.
Linker Errors
Linker errors occur after all source code files have been successfully compiled and the phrase "Linking ..." appears in the output window. Common causes of linker errors are undefined or multiply defined global variables or functions. If you get stuck, try using the error number (LNKxxx) to locate the MSDN document describing the general nature of the error. Link errors sometimes involve the linker options. Select [Settings] from the [Project] menu to display the [Project Settings] dialog box, then select the [Link] tab to see or change the linker options.
Testing
Program testing can only begin after the program has been successfully compiled and linked. Two types of errors occur during testing: runtime errors and logic errors.
With a runtime error the program begins running, but then crashes or gets stuck pursuing a never ending calculation. With a logic error, the program runs to completion, but simply produces the wrong answer. Logic errors are the worst type of error. The mistake is usually in the implementation or choice of algorithm. Sometimes it is necessary to redesign the entire program!
Debugging
There are tricks for discovering the cause of a runtime error. Some programmers insert diagnostic messages in their programs so they can trace the flow of execution. Useful diagnostic messages print the values of suspicious or strategic expressions. Unfortunately, this doesn't work for programs with graphical user interfaces.
MFC applications can use the TRACE() macro to display diagnostic messages:
TRACE("x = %d, y = %f\n", x, y); // similar to printf()
TRACE() only works when the program is being executed by the debugger. In this case TRACE() strings are displayed in the output window.
A better solution is to use the Visual C++ debugger. To do this, make sure the active configuration is set to Debug before you build.
The Visual C++ Debugger
Normally, C++ programs are executed by the computer's CPU (Central Processing Unit). VC++ also provides a virtual machine called the debugger that can execute C++ programs (with the help of the CPU). Unlike the CPU, the debugger allows programmers to step through their programs- one instruction at a time, or one function at a time -while observing critical variables and expressions.
Pressing the [F11] key activates the debugger. The user interface changes dramatically. The title bar changes, the [Build] menu is replaced by a [Debug] menu, new toolbars appear, and new windows appear. The debugger's GUI has five new docking windows: [Registers], [Memory], [Call Stack], [Watch], and [Variables].
Registers, Memory, and Stack
The [Registers] window shows the CPU's registers (EAX, EBX, ECX, EDX, etc.). The [Memory] window shows the entire contents of memory, in hex and binary! These windows are mostly for hard core debugging sessions. The [Call Stack] window shows the stack of functions that are currently active (i.e., they have been called, but haven't returned yet). This is especially useful for quickly locating bugs. When a program being run by the debugger crashes, begin looking for the bug in the topmost non-library function on the call stack.
Programmers can step through their program one instruction at a time by pressing the [F11] key or one function at a time by pressing the [F10] key. Press the [F11] key while holding down the [Shift] key to step out of a function.
The Variables Window
Notice that the [Variables] window consists of three tabbed spread sheets: Auto, Locals, and "this". The Locals sheet shows all of the parameters and local variables of the current function (i.e., the function containing the instruction pointer). The Auto sheet shows the values of all variables appearing in the current expression and the previous expression. When the instruction pointer enters a member function, the implicit parameter is displayed in the sheet tabbed "this". Programmers can even change the values of a variables by typing the new value in its Value cell!
Setting Permanent and Temporary Breakpoints
After examining the call stack, a programmer has a rough idea where his bug is located. Now he wants to quickly execute the first part of the program, pausing just before the suspicious instruction. There are two ways to do this: set a temporary breakpoint by placing the mouse cursor just before the suspicious instruction, then click the left mouse button to move the insertion point to that spot, or set a "permanent" breakpoint by placing the mouse cursor just before the suspicious instruction, then click the right mouse button to display a shortcut menu. Select the [Insert/Remove Breakpoint] option. A large brownish dot appears next to the instruction. (Repeat this process to remove the breakpoint.)
If you set a temporary breakpoint, then select [Run to Cursor] ([Ctrl] +[F10]) from the [Start Debug] submenu of the [Build] menu or from the [Debug] menu. This runs the program to the insertion point. If you set a permanent breakpoint, then select [Go] ([F5]) from the [Start Debug] submenu of the [Build] menu or from the [Debug] menu. This runs the program to the next permanent breakpoint. In either case you may now use the [F10] or [F11] keys to carefully trace through the remainder of the program.