CS 46A Lab 4
Workspaces, Projects, and Files
Department of Mathematics and Computer Science
San Jose State University
The Document-View Architecture
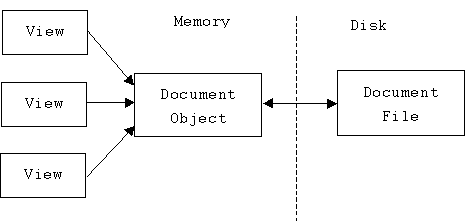
Most Windows applications have two classes of objects: documents and views. A document contains application specific data. A view is an object-- usually a window-- that shows some or all of the data in a particular document. There may be many views of a single document.
Saving a document writes its data into a document file. Opening a document file reads the application data into a document object in the application's memory. A document file usually has an extension indicating what type of data it contains. For example, a Word document file has a .doc extension. An Excel document file has a .xls extension. Naturally, trying to open a .xls document using Word won't work.
Creating Workspaces, Projects, and Files
MSDS is unusual because it creates, edits, saves, and opens several types of documents. The basic document is a workspace. Workspace files have a .dsw extension. Views of a workspaces are contained in the workspace window. There are several views, including File View and Class View. MSDS can only have one workspace opened at a time.
The Planets Workspace
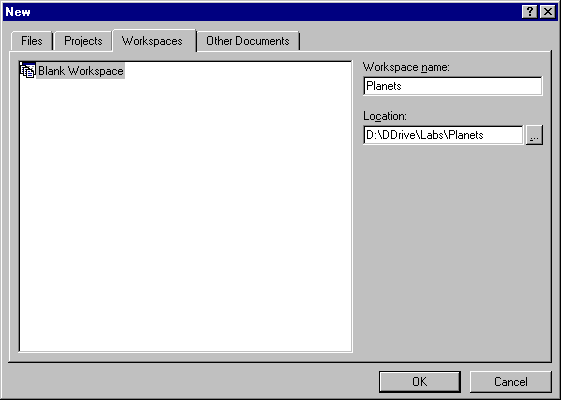
Start MSDS. Select New from the File menu and press the Workspace tab. Type the name "Planets" into the "Workspace name" edit control. Press the button next to the "Location" edit control and choose some place to put the new workspace. Always choose a directory (folder) on a local hard disk (i.e., the C: drive) because compiling files over a network or on a floppy can be very slow.
The Planets Project (Version 1)
A workspace is a container that holds projects. A project is another kind of document that MSDS creates, edits, saves, and opens. Project documents are saved in document files with .dsp extensions. The file and class views of the workspace are tree controls that can be expanded into views of the projects contained inside.
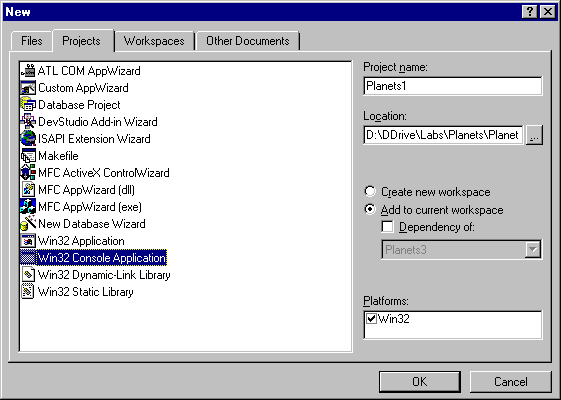
Select New again from the File menu. This time select the Project tab. Select "Win32 Console Application" from the list box, type "Planets1", the name of the project, into the "Project name" edit control, and make sure the "Add to current workspace" radio button is pressed. Press the OK button.
We have just added a new project called Planets1 to the Planets workspace.
(A console application is a program that must be run from a DOS console. Users interact with console applications by typing and reading text. A Windows application (Win32 Application) has its own graphical user interface (GUI) and runs directly on top of the Windows operating system.)
main() for Planets1
A project is also a container! It contains files and Configurations. Many types of files can be put into a project, including Java, C, and C++ source files; header files; html files; text files; even Word and Excel files. A setting is a set of compiler and linker options. Document windows are file views.
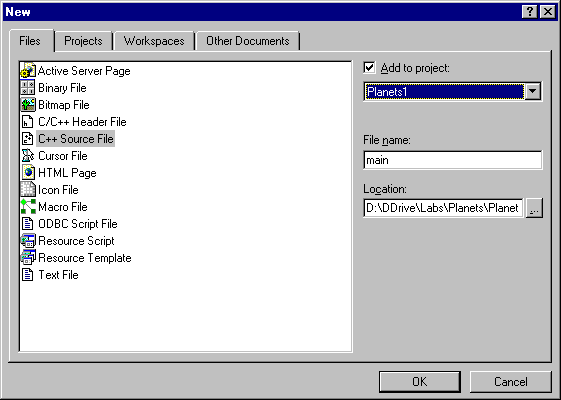
Select New a third time from the File menu. Select the File tab this time. Select "C++ source file" from the list box, then type the name "main" into the "File name" edit control. Press the OK button.
A document window for main.cpp should appear in the view area. Type the following C++ program into this window:
#include <iostream>
using namespace std;
int main()
{
cout << "Hello, Earth!\n";
return 0;
}
Build and Test Planets1
Select "Build Planets1.exe" from the Build menu. You should see the following messages displayed in the build tab of the output window:
-----------Configuration: Planets1 - Win32 Debug--------------
Compiling...
main.cpp
Linking...
Planets1.exe - 0 error(s), 0 warning(s)
Select "Execute Planets1.exe" from the Build menu. A DOS console window should appear displaying the text "Hello, Earth!".
Congradulations. You have completed your first VC++ project.
Planets (Version 2)
Follow the same steps to create a second project called Planets2 in the same workspace. Create a new C++ source file for this project, also called main. This time main is a little more ambitious:
#include <iostream>
using namespace std;
int main()
{
cout << "Hello, Earth!\n";
cout << "Hello, Mars!\n";
cout << "Hello, Venus!\n";
cout << "Hello, Mercury!\n";
return 0;
}
Build and test this program.
Planets for Windows (Version 3)
Build a third Planets project called Planets3, only this time select MFC App Wizard (exe) as the project type. MFC stands for Microsoft Foundation Class. It is a framework for building windows applications (as opposed to console applications). A dialog box appears asking what type of application you want. Just press the Finish button. Press the OK button in the dialog that appears next.
The App Wizard automatically generates many files and classes for you. When it is done, you can build and test the application. It does quite a bit considering you haven't written any code yet.
Look at the File View in the workspace window. Notice that the files from all three projects are listed in a tree control. Switch to the Class View tab. Planets 1 and 2 don't have any classes, but Planets3 has six classes, including CPlanets3Doc (the document class) and CPlanets3View (the view class). 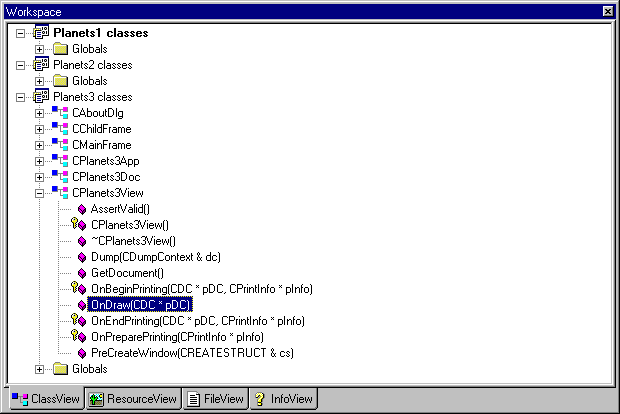 The class view of a project can be used to quickly navigate through the project's many definitions.
Expand the CPlanets3View class and double click on the OnDraw() function. A document view should pop up displaying the file Planets3View.cpp. The OnDraw function displays shapes and text in the application's document windows. Add the bold face lines shown below to your OnDraw function. (The numbers are window coordinates, CDC stands for "Class: Device Context", pDC stands for "pointer to Device Context", and TextOut() is a device context member function. Anything that can accept output in Windows, such as a window or printer, is represented by a device context.):
void CPlanets3View::OnDraw(CDC* pDC)
{
CPlanets3Doc* pDoc = GetDocument();
ASSERT_VALID(pDoc);
// TODO: add draw code for native data here
pDC->TextOut(5, 0, "Hello, Earth!");
pDC->TextOut(5, 50, "Hello, Mars!");
pDC->TextOut(5, 100, "Hello, Venus!");
}
Rebuild and test Planets3. You should see a desktop window containing a document window like the one below:
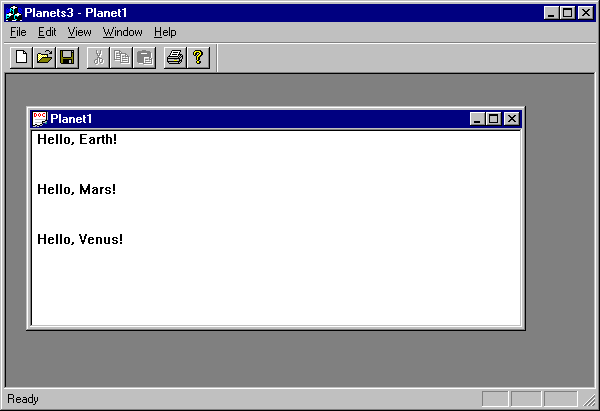
This is a full fledged windows application! Play with it. Select New from its File menu. What happens? Select New Window from the Windows menu. What happens? How is it different from the earlier console versions of Planets?
Executing Planets from the Desktop or a DOS Console
Quit MSDS, then locate the Planets folder on the desktop. This folder contains the planets workspace in the file Planets.dsw. The three projects are contained in the subfolders Plenets1, Planets2, and Planets3.
Open these folders. Inside each one is a file with a .dsp extension. These files contain the corresponding project documents. These folders also include the project's C++ files.
Open the Debug folder inside the Project3 folder. This folder contains Planet3's object and executable files. See the Planets3.exe icon? Double click on it with the left mouse button. What happens?
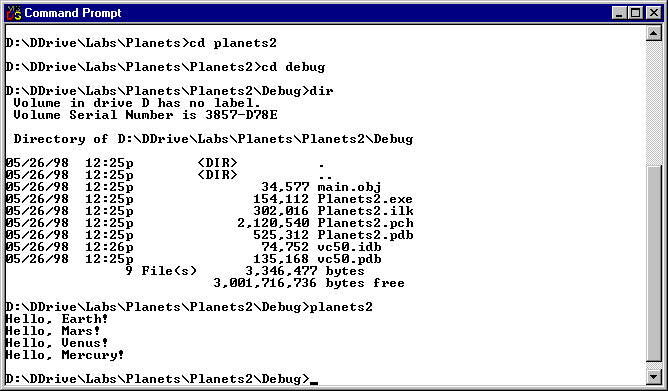
Open the Debug folder inside the Planets2 folder. The icon called Planets2 represents the Planets2 executable. Double clicking on this produces a momentary flash. What happened?
Start the command prompt from the Start menu. (This is the same as the DOS console.) Use the cd command to change to the planets2\debug directory, then type planets2:
Improving Planets (Version 2.1)
Restart MSDS. Select "Open Workspace" from the File menu. Find the file Planets.dsw in the Open Workspace dialog box and open it. Select "Set Active Project" submenu from the Project menu and select Planets2. Use the File View tab of the Workspace window to open Planet2's main.cpp file, and add a few more planets:
#include <iostream>
using namespace std;
int main()
{
cout << "Hello, Earth!\n";
cout << "Hello, Mars!\n";
cout << "Hello, Venus!\n";
cout << "Hello, Mercury!\n";
cout << "Hello, Uranus!\n";
cout << "Hello, Saturn!\n";
cout << "Hello, Jupiter!\n";
cout << "Hello, Neptune!\n";
// sorry, Pluto
return 0;
}
Rebuild and test Planets2.
Adding a Text File to a Project
Add a readme.txt file to your project containing instructions to the user:
Planets displays a complete list of
all eight planets. If you enjoy it,
please send me $100!
Inserting a File into a Project
We often need to insert existing files into a project. For example, to insert the readme.txt file into Planets3, make Planets3 the active project, then select Files from the "Add to Project" submenu under the Project menu.
Planets for the Web (Version 4)
Create Planets4, a fourth project added in the Planets workspace. Add an HTML file to the project. To do this select New from the File menu. Select the file tab from the New dialog box, select "HTML page" from the list box, give it a name, then press OK. This generates an HTML boilerplate. Replace the line:
<!-- Insert HTML here -->
with the lines shown in boldface below:
<HTML>
<HEAD>
<META NAME="GENERATOR" Content="Microsoft Developer Studio">
<META HTTP-EQUIV="Content-Type" content="text/html; charset=iso-8859-1">
<TITLE>Document Title</TITLE>
</HEAD>
<BODY>
Hello, Earth! <br>
Hello, Mars! <br>
Hello, Venus! <br>
Hello, Mercury! <br>
Hello, Uranus! <br>
Hello, Saturn! <br>
Hello, Jupiter! <br>
Hello, Neptune!
</BODY>
</HTML>
Use your favorite web browser to test the HTML version.
Actually, InfoViewer is a web browser (although not anyone's favorite). I typed:
file://d:/ddrive/labs/planets/planets4/planets.htm
into the combo box on InfoViewer's toolbar to get the display below. (Your pathname will be different.)

Release vs. Debug Versions
In order to execute a program in the debugger, special library functions that help the debugger have to be linked into the program. This is why the executables for even the simple console versions of Planets are large. Of course, when we decide to go commercial with Planets, we'll want to rebuild the executable without these special debugger functions. Certainly our customers (and teachers) aren't interested in debugging our program, and they'll appreciate a smaller, more compact executable.
Open the Planets workspace and set the active project to Planets2. Assuming debugging is complete, select "Select Active Configuration" from the build menu. The following dialog box appears:
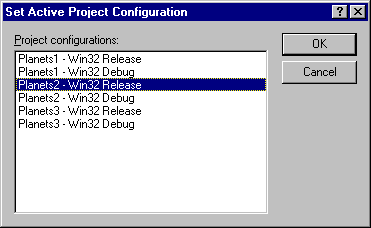
Select "Planets2-Win32 Release" and press OK. Rebuild and test your application. Browsing through the Planets\Planets2 folder, you will discover that a new folder called Release has been created. It contains the .obj and .exe files for the release version of Planets. Compare the size of the executable with the size of the debug version. (If you didn't write down the size earlier, you'll have to reset the active configuration to debug and rebuild the executable.)
Removing and Adding Files from a Project
To remove a file from a project, click once on the file's icon in the File View tree control in the Workspace window, then press the Delete key. The same technique can also be used to remove projects from a workspace.
To add a file that already exists to a project, select Files from the "Add to Project" submenu of the Project menu. (If your workspace contains multiple projects, make sure the right project is selected.) Note: the file doesn't need to be in any particular directory.
Backing up a Project
Of course you should keep a backup copy of your project, but a large project may exceed the capacity of a single floppy disk. On the other hand, there's no reason to back up large .exe and .obj files that can be automatically regenerated from your source code. Select Clean from the Project menu. This gets rid of all files that can be automatically regenerated. Now use Windows Explorer to copy your project folder onto a floppy disk.
Shortcut Menus
Almost all Windows objects have shortcut menus containing the most common operations performed on the object. The shortcut menu is displayed by placing the mouse cursor over the object's icon, then pressing the right mouse button. For example, we use the MSDS user interface's shortcut menu to open and close docking windows and toolbars.
Similarly, the icons that appear in the workspace window-- classes, member functions and variables under the Class View tab and workspaces, projects, and files under the File View tab-- have shortcut menus. Using the shortcut menu of a workspace, we can create, insert, and remove projects. A project's shortcut menu allows us to build the project, make the project the active project, and insert and remove files (but not create new files). A file's shortcut menu allows us to open and compile the file.
Configurations
Besides files, a project also includes configurations. There are two predefined configurations: Release and Debug. The "Set Active Configuration" command on the Build menu allows programmers to select a setting. The Configurations command on the Build menu allows programmers to add and remove configurations to their project.
A configuration is a collection of compiler, linker, debugger, and other settings. Select settings from the Project menu to display the settings dialog box. It is a tabbed window that allows programmers to change settings on these components:
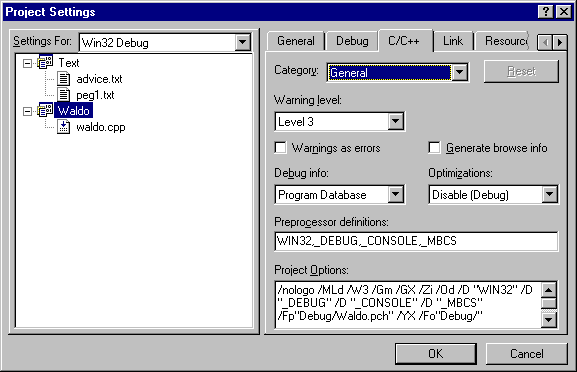
See the IV Topic Compiling and Linking to understand what these settings do.