CS 46A Lab 3
Editing
Department of Mathematics and Computer Science
San Jose State University
Creating Files
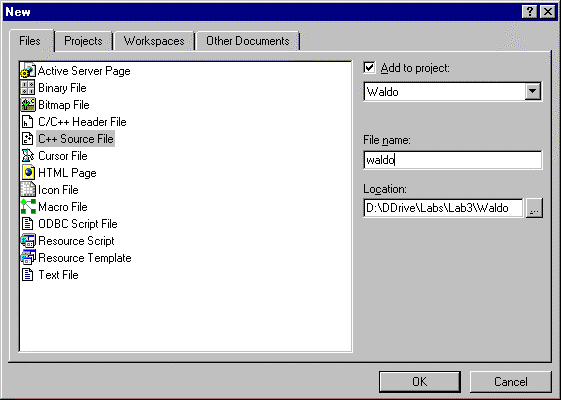
Selecting New from the File menu displays a tabbed dialog box that allows users to decide what kind of new document to make: a file? A project? A workspace? Even an Excel, Word, or Power Point document.
Several types of files can be created, including C/C++ header files, C++ source files, HTML files (i.e., web pages,) and ordinary text files. Select the type of file to be created, type the name of the new file into the "File name" edit control, press the button next to the "Location" edit control to select the folder (directory) where the new file is to be created, then press the OK button. MSDS automatically adds the appropriate extension to your file name (e.g., .h, .cpp. .c, .html, .txt, etc.)

Opening Files
Although the New command allows users to create files or workspaces, the File menu commands for opening, saving, and closing files are different from the corresponding commands for workspaces.
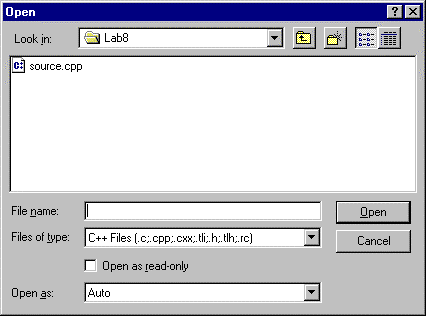
Select Open from the File menu to open an existing file. It is important to understand how all the controls on this dialog box work.

Recall that the documents, folders, and programs on a disk are organized into a tree-like structure. A folder is a parent node in this tree. The documents, programs, and subfolders contained in a folder are its child nodes. Windows NT Explorer makes this tree structure explicit:

The current folder is displayed in the "Look in" combo box at the top of the dialog box. The list box below this control shows the contents of the current folder. Double click on a file in the contents list box to open it. Double click on any folder in the contents list box to make it the new current folder. Use the triangle button next to the "Look in" combo box to make an ancestor of the current folder the new current folder.
In fact, not all contents of the current folder are displayed in the contents list box. Only files of the type selected in the "Files of type" combo box are displayed. The button to the right of this control allows users to select the file type, including the last option, "All Files".
Saving Files
Saving a file is easy. Just select Save from the File menu or press Ctrl+s (i.e. press the s key while holding down the control (Ctrl) key).
Save As
Sometimes programmers want to experiment with a new version of an existing file without modifying the original. Open the original file and select "Save As" from the File menu. Type the name of the new version in the "File name" edit control. Use the "Save in" control or the contents list box to select the folder for the new version.
Closing Files
Select Close from the File menu to close a file. Alternatively, click the close box of the window the file is displayed in. The editor asks the user if she wants to save any changes made since the last save operation.
Editing Files
After a file has been opened, the MSDS editor can be used to edit it. Documentation for the editor can be found in the InfoViewer Volume:
Developer Products
Visual C++
Developer Studio Environment User's Guide
Text Editor
Inserting Text
The text of a document created by an editor can be thought of as a two dimensional array of characters:
text[i][j] = the character in row i, column j.
The insertion point looks like a solid vertical bar. It marks a position (row and column) in this array.
In insertion mode, typing inserts characters in front of the insertion point, pushing the insertion point and characters behind the insertion point into higher columns within the same row. Thus, the row gets longer.
In substitution mode typing replaces characters behind the insertion point with new characters. Pressing the Insert key on the keyboard toggles between the two modes. Insertion is the default mode.
Pressing the Enter key (on some keyboards this might also be called the Return key) creates a new row in front of the insertion point. If the insertion point is in the middle of the row, then the Enter key breaks the row into two rows.
Pressing the Back Space key deletes characters in front of the insertion point and moves it to the left and up. Pressing the Delete key deletes characters behind the insertion point.
Moving the Insertion Point
Moving the mouse moves the mouse cursor. The cursor is context sensitive. It changes appearance depending on where it is and what is happening. It looks like an hour glass when it's time to wait. It looks like an arrow when it's over something that can be selected, like a toolbar or a menu; and it sort of looks like an insertion point when its over something that can accept keyboard input, like the text area of a document.
Clicking the left mouse button when the cursor is over text moves the editor's insertion point to the mouse cursor.
The left and right arrow keys move the insertion point from one column to the next. At the beginning or end of a row the insertion point jumps to the end of the previous row or the beginning of the next row, respectively. The up and down arrow keys move the insertion point from one row to the next. The Home and End keys move the insertion point to the beginning and end of its row, respectively. The Page Up and Page Down keys move the insertion point to the top and bottom of the screen, respectively. (Note: the insertion point doesn't appear to move. Instead, the text appears to move under the insertion point.)
Notice that the keys on most keyboards are divided into four groups. Across the top are the shortcut keys, F1 through F12. Text insertion keys-- letters, digits, punctuation, symbols, and control keys-- form the largest group in the lower left. The insertion point movement keys (and the Delete key) are to the right of these keys. On the far right of the keyboard a cluster of keys duplicates the digit and arithmetic operator keys when Num Lock is on, and duplicates the Home, End, Page Up, Page Down, Insert, Delete, Enter, and arrow keys when Num Lock is off.
Selecting Text
To perform an operation on a block of text-- move, copy, or delete for example-- the text must first be selected. Place the mouse cursor at one end of the text to be selected, hold down the left mouse button, drag the mouse to the other end, then release the mouse button. The selected text should be highlighted. To select all of the text in a document, choose "Select All" from the Edit menu or press Ctrl+a (i.e., press a while holding down the control (Ctrl) key).
Double clicking on a word selects the entire word, Triple clicking on a paragraph selects the entire paragraph or line. (A paragraph is defined as the text between two newline characters.)
Moving and Copying Text
There are two ways to move or copy text: using the clipboard or using drag-and-drop.
The clipboard is a general purpose buffer maintained by the Windows operating system. Pressing Ctrl+x or selecting Cut from the Edit menu moves the selected text from your document to the clipboard. Pressing Ctrl+c or selecting Copy from the Edit menu copies the selected text into the clipboard. (What's the difference between moving and copying text?)
Place the insertion point where you want the text moved or copied to, then press Ctrl+v or select Paste from the Edit menu. The contents of the clipboard will be copied in front of the insertion point. (A copy of the text remains in the clipboard.)
The clipboard can only hold one object (e.g., a block of text, a diagram, an Excel worksheet, etc.). The object can be any size, but each time a new object is copied or moved into the clipboard, it replaces the previous object. Be careful! Once an object has been replaced in the clipboard, it's gone.
Alternatively, place the mouse cursor in the selected text, hold the left mouse button down, drag the entire selection to the place where you want it to go, then drop it there by releasing the mouse button. This operation moves the text. Holding down the Ctrl key during this operation causes a copy of the selected text to be dragged and dropped.
Deleting and Replacing Text
Deleting text is easy. Select the text to be deleted, then press the Delete key, the Back Space key, begin typing new replacement text, or paste text from the clipboard over the selected text.
Oops! Undo and Redo
The greatest invention in all of computer science is the Undo command. (I wish life had an Undo command!) Selecting Undo from the Edit menu or pressing Ctrl+z, undoes the last editing operation performed. (Be careful, some editing operations can't be undone.) Undo too much? No problem, select Redo (Ctrl+y) from the Edit menu.
Finding and Replacing Text
Finding repeated occurrences of text using the Find Dialog box is difficult to do in MSDS. Selecting Find from the Edit menu displays the Find dialog box, which allows users to enter a literal string or regular expression to be located. Pressing the "Find Next" button locates the next occurrence of the string in the text, but then the Find dialog box disappears. When it is made to reappear, the search string must be retyped!
Pressing the Find dialog's "Mark All" button causes blue markers to be placed at the beginning of each line containing the string. No one knows how to make the blue markers go away (maybe this would be a good research project for a Ph.D. thesis), so the next time "Mark All" is used to locate all occurrences of another string, the new blue markers are mixed with the old ones.
Fortunately, the Replace dialog box works, and can be used to find or replace text, but be careful. Select Replace from the Edit menu to summons the Replace dialog box. Enter the literal string or regular expression to be located or replaced in the "Find what" combo box. Enter the replacement string in the "Replace with" combo box to replace the search string. The Find Next button will locate the next occurrence of the search string. Because the Replace dialog doesn't disappear, the Find Next button can be pressed repeatedly to find subsequent occurrences of the string.