J2ME Programming (Part I)
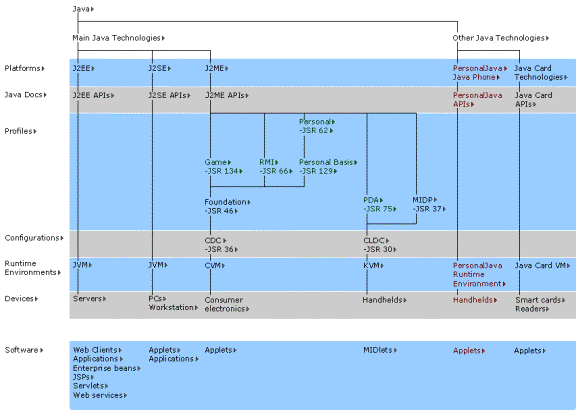
J2ME Overview
J2ME (Java 2 Micro Edition) is a family of APIs that specify application platforms that are typically implemented by embedded or handheld devices. Handheld devices include PDAs (Personal Digital Assistants) and high-end mobile phones. These platforms are typically limited in memory capacity and I/O capabilities, although they do have the ability to transfer data over low bandwidth, intermittent wireless connections.
J2ME Stacks
CLDC Requirements:
monochrome 96x54 pixel display
2-way wireless network
input device (keypad, touch screen)
128 Kb for CLDC/MIDP classes + 32 Kb for KVM
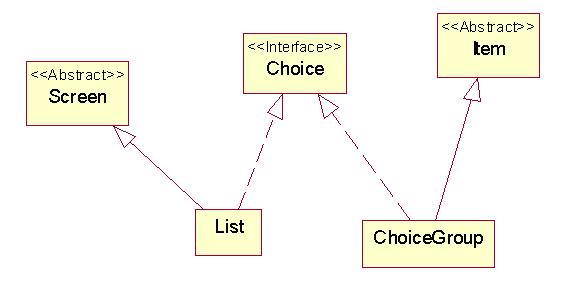
CLDC Classes
Interfaces and exceptions not shown.
java.lang
Object
Boolean, Character
Integer, Long, Short, Byte
Class
Math
Runtime, System
String, StringBuffer
Thread
Throwable
java.io
InputStream
ByteArrayInputStream
DataInputStream
OutputStream
ByteArrayOutputStream
DataOutputStream
PrintStream
Reader
InputStreamReader
Writer
OutputStreamWriter
java.util
Calendar
Date
HashTable
Random
Timer
TimerTask
TimeZone
Vector
Stack
MIDP Packages
javax.microedition.io
javax.microedition.lcdui (user interface)
javax.microedition.lcdui.game
javax.microedition.media (media player)
javax.microedition.media.control
javax.microedition.midlet
javax.microedition.pki (certification)
javax.microedition.rms (persistence)
J2ME SDKs
Motorola SDK
RIM SDK
Java SDK
Competing Technologies
WAP/WML
I-Mode
Windows CE
Quick Start: "Hello World"
We will be using the Sun/Java J2ME SDK. This SDK includes the J2ME Wireless Toolkit. Here's its GUI (called K Toolbar):

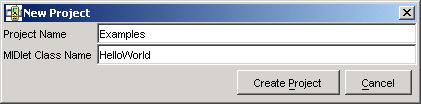
Creating a New Project and Midlet
Applications that run on a MIDP/CLDC platform are called midlets. By pressing the "New Project" button we create a new project named Examples containing a midlet defined in a file named HelloWorld.class:
The console window informs us that it has created a project directory named Examples containing src, res, and lib subdirectories:

Other subdirectories have been created as well. We must save our .java files in the Examples\src subdirectory.
HelloWorld.java
The file Examples\src\HelloWorld.java is created using an ordinary text editor. It begins by importing several J2ME packages:
import javax.microedition.lcdui.*;
import javax.microedition.midlet.*;
The declaration of the HelloWorld class follows:
public class HelloWorld extends MIDlet {
// Device's display window and main
screen:
private Display theDisplay;
private Screen mainScreen;
public HelloWorld() {
theDisplay =
Display.getDisplay(this);
mainScreen = new TextBox(
"Example 1",
"Hello World", 50, TextField.ANY);
}
// Lifecycle methods:
protected void startApp() {
theDisplay.setCurrent(mainScreen);
}
protected void destroyApp(boolean
unconditional) { }
protected void pauseApp() { }
}
Notice that HelloWorld extends MIDlet. Two instance variables are declared and subsequently initialized by the constructor. theDisplay represents the display window of the PDA or mobile phone. mainScreen represents the screen that theDisplay is supposed to display. This is accomplished in startApp() method by the line:
theDisplay.setCurrent(mainScreen);
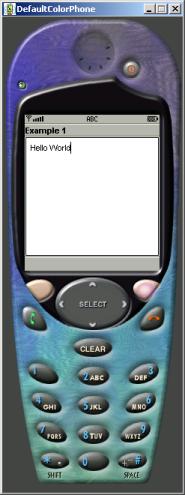
startApp() is one of three lifecycle methods every midlet must define. In most of our examples the other two have empty bodies. We can think of theDisplay as a mini web browser and mainWindow as a type of web page. In our example, mainPage is a text box titled "Example 1" and containing the text "Hello World".
Running HelloWorld
Pressing the Build button on the toolbar causes the Wireless Toolkit to compile all .java files in the current project's src subdirectory. The corresponding .class files are placed in the classes subdirectory. Next, the .class files are pre-verified. If a .class file passes various security checks, it is tagged as verified. All of the project's verified files are placed in an archive file called Examples.jad. This file is placed in the bin subdirectory.
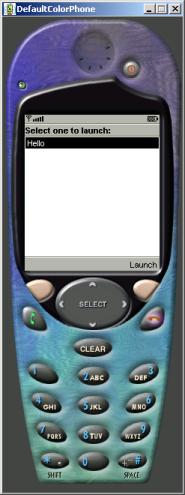
Pressing the Run button on the toolbar causes the Wireless Toolkit to start a mobile phone simulator. The Examples application suite is "downloaded" to the "phone," which displays the suite's midlets in its window. Currently, HelloWorld is the only midlet. Launching this midlet causes the window to display the midlet's main page. Use the red "hang up" button to terminate the midlet.
J2ME APIs
HelloWorld extended the MIDlet class and contains references to a Display object (theDisplay) and a TextBox object (mainScreen). TextBox extends the Screen class, which is the base class for all high-level GUIs. Low-level displays, where the programmer must define his own graphics, extend the Canvas class.
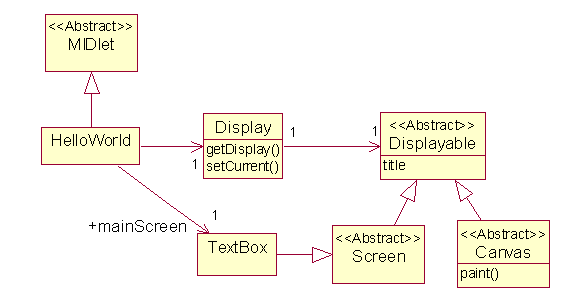
Typically, a midlet creates a collection of displayable objects-- screens and/or canvases:
Displayable[] displayables = new Displayable[N];
for (int i = 0; i < N; i++) {
// create displayables[i]
}
The midlet responds to user input commands by selecting a displayable object from this collection, then asking the display to display it with the command:
theDisplay.setCurrent(displayables[next]);
Here's a more comprehensive class diagram showing the lcdui package:
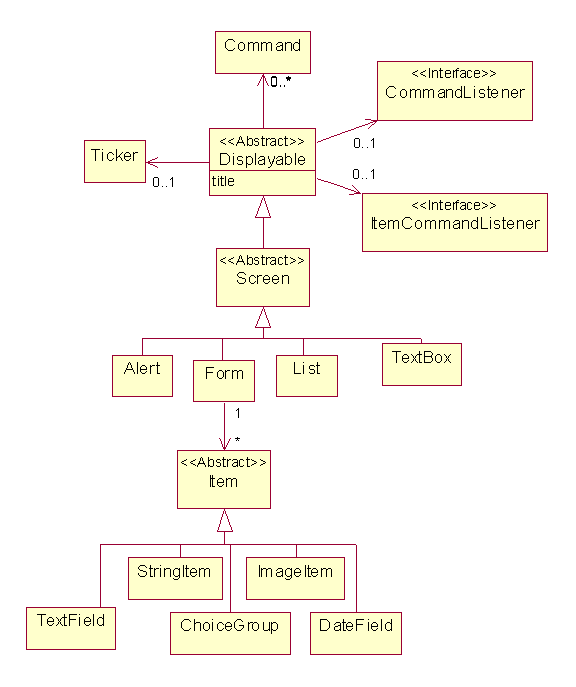
First notice that in addition to text boxes, there are three other types of screens: alerts (a message dialog that flashes on the display), forms (a control panel containing control items such as labels, text fields, and buttons), and lists.
A displayable can fire and handle commands. A command is fired when the user presses keypad buttons when the displayable is the current window. When a command is fired, a command object is passed to the commandAction() method of each registered command listener. Typically, the midlet is the command listener.
Form items also fire commands. When an item command is fired, a command object is passed to the commandAction() method of each registered item command listener. Typically, the midlet or the parent form is the item command listener.
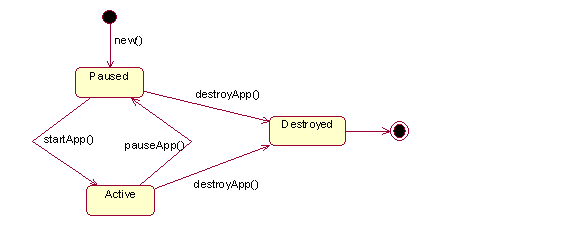
The J2ME Application Manager
The Application manager manages the lifecycles of midlets:
Commands and The Midlet as a Command Processor
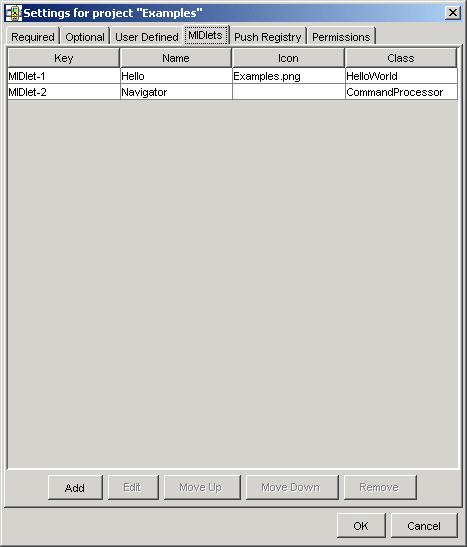
To demonstrate commands and command processing, let's add a new midlet to the Examples project. Pressing the Settings button on the Wireless Toolkit toolbar displays the Settings dialog. Pressing the Add button at the bottom of this dialog allows us to add a new project called navigator contained in the CommandProcessor.class file:
Running the Command Processor
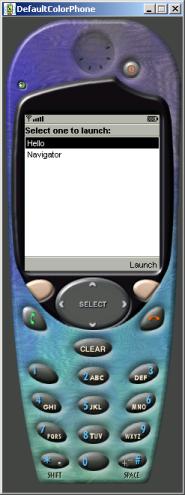
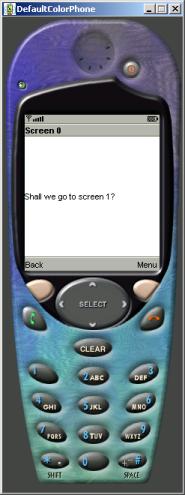
Here are some screen shots of the Navigator running on the simulator. Notice that the opening screen now shows the Examples suite contains two midlets. Selecting the navigator midlet causes the midlet's first screen to appear. The screen is titled "Screen 0" and displays the question "Shall we go to screen 1?". That's all Navigator allows users to do: to navigate from screen i to screen j.
Notice that the phone's soft buttons are labeled Back and Menu. The Back button will allow us to return to the midlet's previous screen. The menu button displays a list of commands the current screen can fire:
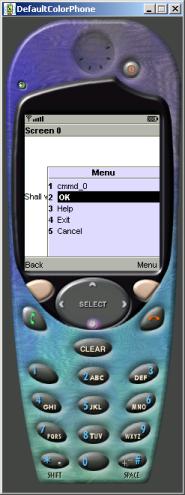
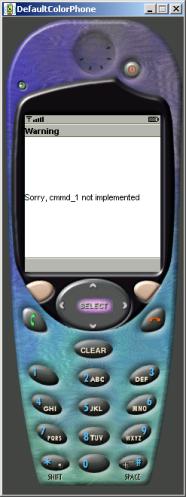
Here's what the menu items do:
cmmd_0: displays an
unimplemented warning screen
OK: displays suggested screen (screen
1)
Help: displays special help
screen"
Exit: terminates midlet
Cancel: Return to previous screen
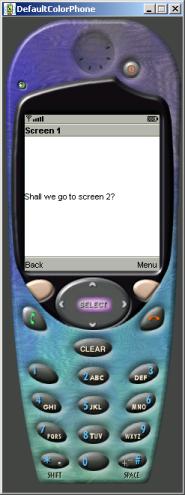
Here are some shots of these other screens:
CommandProcessor.java
The command processor midlet has much in common with HelloWorld. Instead of a single screen, the constructor will create an array of five screens plus a help screen. The startApp() method will display screen[0] in theDisplay.
public class CommandProcessor extends MIDlet
implements CommandListener {
// pre-defined commands:
private final static Command CMD_EXIT
= new Command("Exit",
Command.EXIT, 1);
private final static Command CMD_OK
= new Command("OK",
Command.OK, 1);
private final static Command CMD_CANCEL
= new Command("Cancel",
Command.CANCEL, 1);
private final static Command CMD_BACK
= new Command("Back",
Command.BACK, 1);
private final static Command CMD_HELP
= new Command("Help",
Command.HELP, 1);
// Device display window:
private Display theDisplay;
// screens:
private Screen helpScreen;
private static final int MAX_SCREENS =
5;
private int currentScreen = 0;
private Screen[] screens = new
Screen[MAX_SCREENS];
// Screen factory method:
private Screen makeScreen(int i) { ...
}
// create screens:
public CommandProcessor() { ... }
// Lifecycle methods:
protected void destroyApp(boolean
unconditional) { }
protected void pauseApp() { }
protected void startApp() {
theDisplay.setCurrent(screens[currentScreen]);
}
// Command handler method:
public void commandAction(Command c,
Displayable d) { ... }
} // CommandProcessor
Creating Screens
Each screen is created in the constructor by calls to the makeScreen() helper method.
CommandProcessor() {
theDisplay = Display.getDisplay(this);
for(int i = 0; i < MAX_SCREENS; i++)
screens[i] = makeScreen(i);
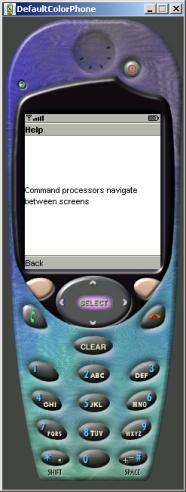
String helpText = "Command
processors navigate between screens";
helpScreen = new
Alert("Help", helpText, null, AlertType.INFO);
((Alert)helpScreen).setTimeout(Alert.FOREVER);
helpScreen.addCommand(CMD_BACK);
helpScreen.setCommandListener(this);
}
The makeScreen() method creates a type of screen called an Alert. An alert is a warning or confirmation that flashes on the display, only in our case we are setting the duration of the flash to be forever (users will have to get rid of the alert by navigating to another screen). Each screen is declared capable of firing five pre-defined commands (OK, CANCEL, BACK, HELP, and EXIT) as well as one custom command (cmmd_0, for example). Finally, the midlet is registered as the screens listener:
Screen makeScreen(int i) {
String title = "Screen " + i;
String text
= "Shall we go to screen "
+ (i + 1) % MAX_SCREENS + "?";
// Screen s = new TextBox(title, text,
50, TextField.ANY);
Screen s = new Alert(title, text,
null, AlertType.INFO);
((Alert)s).setTimeout(Alert.FOREVER);
s.addCommand(CMD_OK);
s.addCommand(CMD_CANCEL);
s.addCommand(CMD_BACK);
s.addCommand(CMD_HELP);
s.addCommand(CMD_EXIT);
s.addCommand(new
Command("cmmd_" + i, Command.SCREEN, 1));
s.setCommandListener(this);
return s;
}
Handling Commands
The CommandProcessor implements the CommandListener interface. This means that it must implement a commandAction() method and that it can subsequently be registered as a listener for the screens. A typical commandAction() implementation uses a switch statement that dispatches to a sub-handler based on the type of the input command. In most cases, a new screen is selected and is set as theDisplay's current displayable:
void commandAction(Command c, Displayable d) {
switch(c.getCommandType()) {
case Command.BACK: // return to
"previous" screen
if (0 < currentScreen) {
theDisplay.setCurrent(screens[--currentScreen]);
} else {
theDisplay.setCurrent(screens[currentScreen]);
}
break;
case Command.OK: // go to
"next" screen
if (currentScreen < MAX_SCREENS
- 1) {
theDisplay.setCurrent(screens[++currentScreen]);
} else {
currentScreen = 0;
theDisplay.setCurrent(screens[currentScreen]);
}
break;
case Command.CANCEL: // return to
main screen
currentScreen = 0;
theDisplay.setCurrent(screens[currentScreen]);
break;
case Command.HELP: // display help
screen
theDisplay.setCurrent(helpScreen);
break;
case Command.ITEM: // handle form
item command
case Command.SCREEN: // handle
screen-specific command
String gripe
=
"Sorry, " + c.getLabel() + " not implemented";
Alert a
= new
Alert("Warning", gripe, null, AlertType.WARNING);
theDisplay.setCurrent(a);
break;
case Command.EXIT: // terminate
midlet
destroyApp(false);
notifyDestroyed();
break;
default: // how did we get here?
gripe = "Unrecognized
command: " + c.getLabel();
a = new Alert("Error",
gripe, null, AlertType.ERROR);
theDisplay.setCurrent(a);
} // switch
}
Menus
Simple Menu
MIDP provides a screen and an i9tem for making choices. Both implement the Choice interface, which defines three different choice styles: Choice.IMPLICIT, Choice.MULTIPLE, and Choice.EXPLICIT:
Here's a simple example of an implicit choice list titled "Main":
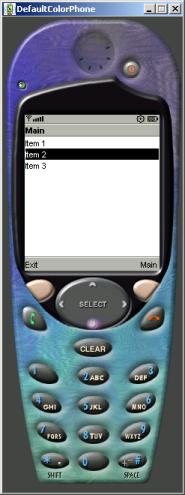
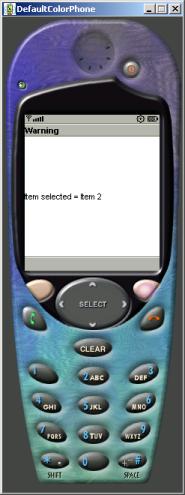
Using the arrows, the user can highlight an item, then press the select button or the soft button labeled "Main". An alert appears momentarily that displays the index of the item selected.
Implementation
The main menu is created out of a list of string items. The main menu fires a command called CMD_MAIN. The command handler gets the index of the selected item from the main menu.
public class Cascade extends MIDlet
implements CommandListener {
// main menu + items:
private Display theDisplay;
String[] items = {"Item
1", "Item 2", "Item 3"};
private List mainMenu
= new List("Main",
Choice.IMPLICIT, items, null);
// pre-defined commands:
private final static Command CMD_EXIT
= new Command("Exit",
Command.EXIT, 1);
private final static Command
CMD_MAIN
= new Command("Main",
Command.ITEM, 1);
public Cascade() {
theDisplay =
Display.getDisplay(this);
mainMenu = new
List("Main", Choice.IMPLICIT, items, null);
mainMenu.setSelectCommand(CMD_MAIN);
mainMenu.addCommand(CMD_EXIT);
mainMenu.setCommandListener(this);
}
// lifecycle methods:
protected void destroyApp(boolean
unconditional) { }
protected void pauseApp() { }
protected void startApp() {
theDisplay.setCurrent(mainMenu);
}
// Command handler method:
public void commandAction(Command c,
Displayable d) {
switch(c.getCommandType()) {
case Command.ITEM:
String text = "Item
selected = ";
selection += items[mainMenu.getSelectedIndex()];
Alert a =
new
Alert("Warning", text, null, AlertType.INFO);
theDisplay.setCurrent(a);
break;
case Command.EXIT:
destroyApp(false);
notifyDestroyed();
break;
} // switch
} // commandAction()
}